Setup guide

Set up PROMO PULSE, module by module.

Step-by-step guides with real screenshots of the dashboard and Discord. The gold markers 123 on each screenshot match the steps in the text.

Screenshots show the French interface; your dashboard shows the same buttons in English.

  • 43module guides
  • 57annotated screenshots
  • 347detailed steps

In 4 steps

Quick start

  1. 1 Invite the bot

    Keep all the permissions offered during the invite, then move the PROMO PULSE role above the roles it needs to manage.

  2. 2 Run /setup

    In any channel: pick the language and open a module family to see each module’s status.

  3. 3 Enable your modules

    On the dashboard, in “Manage modules”, turn on the switch of each module you want to use.

  4. 4 Configure and save

    Follow the module guide below, using the 123 markers, then click the section’s save button.

By goal

I want to…

Pick what you want to do: we’ll show you which modules to set up, in order.

All families

Browse by family

First steps

Getting started with PROMO PULSE

Invite the bot, run /setup, then enable the modules you need from Discord or the dashboard.

Getting started with PROMO PULSE Invite the bot, run /setup, open the dashboard and enable your first modules in a few minutes. Getting started with PROMO PULSE Free /setup 9 steps

Permissions: To configure: the Discord permission Manage Server (the dashboard only lists servers you can manage; /dashboard requires Administrator). On the bot side: keep the permissions requested during the invite, and place the bot’s role above the roles it must assign (XP, tag, mini-games…).

Commands

  • /setupOpens the setup overview in Discord: language, feature families, each module’s status and a link to the dashboard. Requires “Manage Server”.
  • /dashboardGives the direct link to this server’s web dashboard. Administrators only.

Step-by-step setup

  1. Invite the bot: on the PROMO PULSE website, log in with Discord, open the Dashboard and click “Install the bot” on your server’s card (marked “Bot not installed”). Confirm in the Discord window, keeping the suggested permissions.
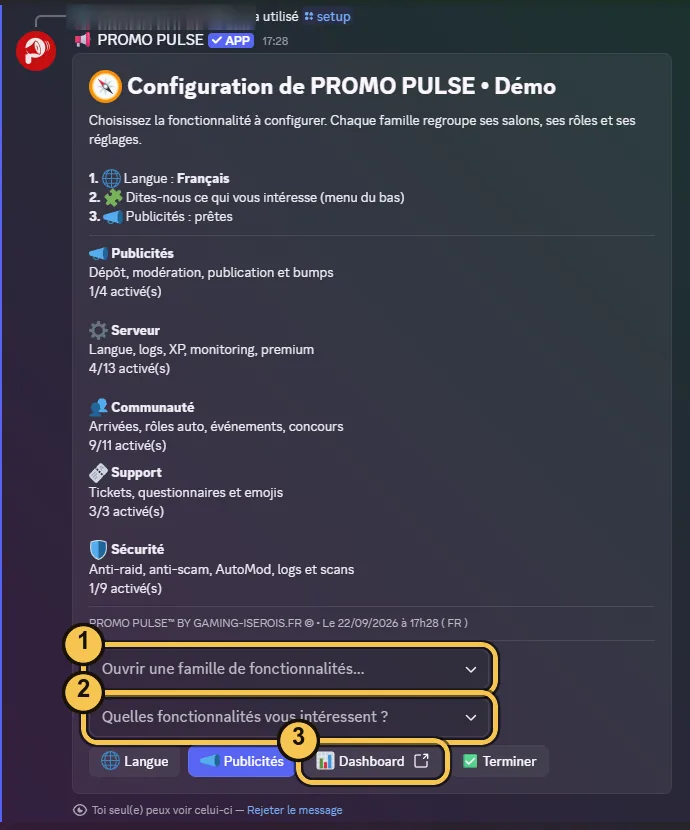
  2. In a channel on your server, type /setup (1 2 on the screenshot). The overview shows the bot’s language, the features you follow and the status of ads.
  3. In the “Which features are you interested in?” menu (2), tick what you want to use: the overview adapts to your choices.
  4. Open a family with “Open a feature family…” (1), for example Server. The “Choose a module…” menu shows each module’s status and how to configure it (dedicated command or dashboard).
  5. To set everything up comfortably, click the Dashboard button (3) or run /dashboard, log in with Discord, then pick your server (“Manage” button).
  6. In the “Manage modules” grid, enable a module with the switch on its card, then click “Open”. A disabled module can’t be opened: its settings stay hidden while the switch is off.
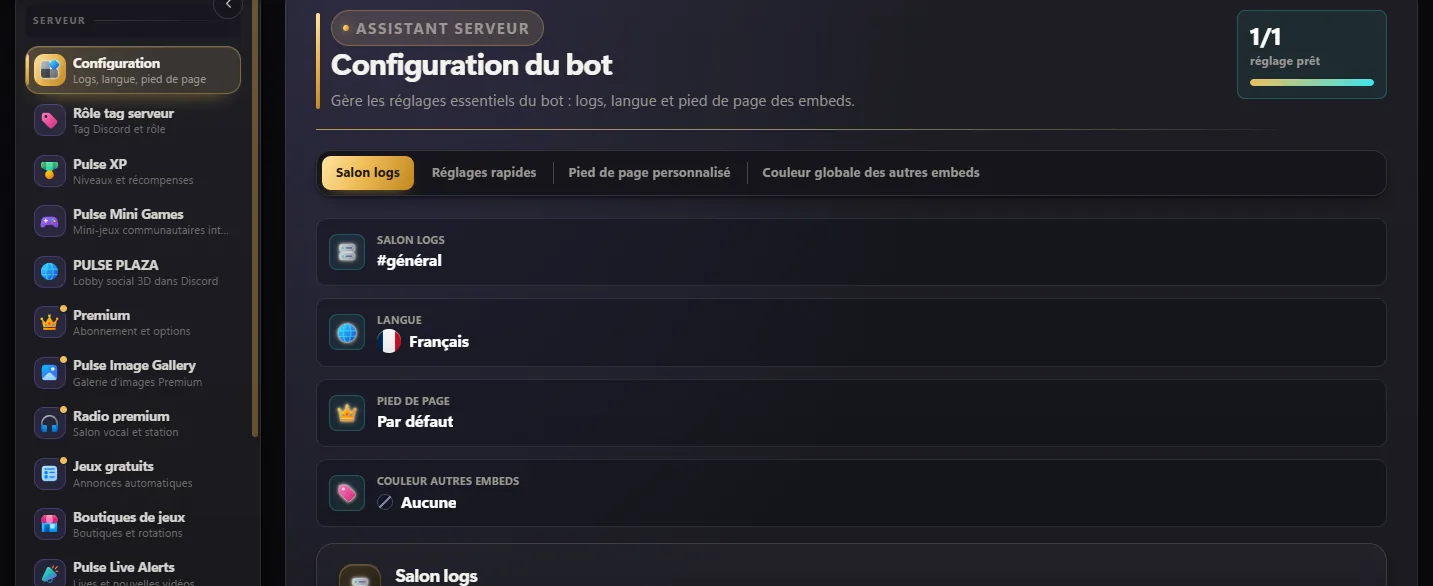
  7. Open the Configuration card: the “Logs channel” tab to choose where the bot logs its important actions, the “Quick settings” tab for the Server language (language of the bot’s messages). Click “Save configuration” (2).
  8. Then configure each enabled module from its section, without forgetting its save button at the bottom of the page: an unsaved setting isn’t applied.
  9. Need to start over? At the bottom of the Configuration section, the “Start from scratch” block offers “Reset configuration” (confirm by typing REINITIALISER).

Key settings

Logs channel
Channel that receives the history of the bot’s important actions. Pick a staff-only channel.
Server language
Language of the messages the bot sends on this server (menus, embeds, replies).
Custom footer
Premium: text shown at the bottom of the bot’s embeds instead of the default footer.
Global color for other embeds
“Color mode”: No color, Fixed color, or Premium multicolor. Applies to the other configurable embeds; logs, warnings and moderation keep their fixed colors.
Start from scratch
Clears channels, roles, language, footer, colors, all modules and security. Keeps Premium, history (member XP, ads, sanctions, tickets, Pulse Restore backups) and anything already created on Discord. This can’t be undone.

Tips

  • If you remove and then re-invite the bot, its configuration is kept for 7 days and comes back automatically: no need to redo everything.
  • The bot’s role must be placed above the roles it assigns, otherwise Discord refuses to add the role even with the “Manage Roles” permission.
  • In a /setup family, the “⚡ Enable / disable modules…” menu lets you turn some modules on without going through the website.
  • Each dashboard section has its own save button at the bottom: remember to click it before switching sections.

Frequently asked questions

My server doesn’t show up in the dashboard.

The dashboard only lists servers where you have the Manage Server permission. Check your role, then log out and log back in with Discord to refresh the list.

A module’s “Open” button is grayed out.

The module is disabled (turn on its switch on the card) or it has the “Premium required” badge: in that case you need to activate Premium for the server.

What does Premium unlock?

The custom footer, multicolor embeds, Pulse Image Gallery, the voice radio, free games, Pulse Restore, automatic anti-scam scanning and higher quotas (e.g. Live Alerts 1 → 15 alerts, Monitoring 5 → 25 services). See the Premium guide.

The bot replies in another language.

Change the Server language in Configuration › Quick settings, then click “Save configuration”. New messages will use that language.

Server family

Server

Language, logs, XP, mini-games, monitoring, embeds, shops, live alerts and Premium options.

Premium A per-server Discord subscription that unlocks exclusive modules and raises quotas. Server Premium 7 steps

Monthly subscription per server, purchased in the app’s Discord store. Raised quotas: Live Alerts 1 → 15, Monitoring 5 → 25 services, Pulse Quest 1 → 25 forms, Game Roles 3 → 50 games, Status Roles 1 → 20 rules, Events 5 → 50, Giveaways 3 → 50.

Permissions: A member makes the purchase from Discord; managing the server on the dashboard requires Manage Server.

Step-by-step setup

  1. Open your server’s dashboard, then the Premium card.
  2. Check the status box: it shows “Subscription inactive” as long as no subscription is linked to the server. The monthly price is shown there.
  3. Click “Activate with Discord”: you land on the app’s store (https://discord.com/discovery/applications/868865646560165949/store).
  4. Subscribe for the right server: Premium is tied to a guild, not to your account.
  5. Payment and management (renewal, cancellation) go entirely through Discord.
  6. Back on the dashboard, click “Sync from Discord” if the status hasn’t updated on its own; “Last synchronization” should show a date.
  7. The “Premium required” cards in the modules grid can now be enabled: turn on the Premium modules with their switch.

Key settings

Premium details
Server, SKU, Origin, Start, Renewal and Last synchronization: useful to check that the subscription is attached to this server.
Unlocked options
Custom footer, Pulse Image Gallery, Premium colors (multicolor), automatic anti-scam scan, voice radio, Pulse Restore, Premium free games, extended versions of Quest, Live Alerts, Game Roles, Status Roles, Events, Giveaways, Monitoring, and a spotlight in the Premium servers showcase.

Tips

  • If you manage several servers, each one needs its own subscription.
  • When it expires, items beyond the free quota aren’t deleted: for example, extra Live alerts are kept and become visible again with Premium.
  • The bot also resyncs the subscription automatically in the background; the sync button is for forcing an immediate update.

Frequently asked questions

I paid but the dashboard still says “Subscription inactive”.

Click “Sync from Discord”. Also check that the subscription was bought for this exact server (Discord asks you to pick the server at purchase).

How do I cancel?

From Discord, in the subscription management of your account or the server. PROMO PULSE doesn’t handle payment.

Are my Premium settings lost if the subscription ends?

No: they’re kept but locked, and become active again as soon as Premium is reactivated.

Pulse Custom Bot A subscription that complements Premium: PROMO PULSE posts its messages under the name, avatar and banner of your own Discord bot. Server Custom Bot subscription /custombot 7 steps

Monthly Custom Bot subscription per server, purchased in the app’s Discord store. It is separate from Premium: you can combine both, and neither includes the other. Gradual rollout: the feature opens in testing first.

Permissions: Setting up the custom bot on the dashboard requires Manage Server. Your bot must be invited with permission to send messages, embeds and files, and PROMO PULSE must stay installed on the server.

Commands

  • /custombotDiscord panel: custom bot status, connection test, subscription link and help.

Step-by-step setup

  1. Open your server’s dashboard, then the Premium card: both subscriptions are shown side by side. Subscribe to Custom Bot from Discord, for the right server.
  2. In the Discord developer portal, create a new bot dedicated to this server (Applications → New Application → Bot).
  3. In the portal’s Bot tab, turn off “Public Bot”: nobody else will be able to invite it.
  4. Copy its token (Reset Token) and paste it in the Token & invite tab of the Custom Bot section. Tick “I understand”, then click Test the token and Save securely.
  5. Invite your bot with the link provided. PROMO PULSE must stay on the server: it runs everything behind the scenes.
  6. Enable the custom bot. In Identity, set its name, avatar, banner and status; in Settings, choose the mode.
  7. Check the Log tab, and use /custombot on Discord to see the status at any time.

Key settings

Mode
Appearance (recommended): messages, embeds, logs and notifications go through your bot; buttons and commands stay on PROMO PULSE. Appearance + commands: slash commands are also published on your bot. Full: everything goes through your bot, including messages with buttons.
PROMO PULSE fallback
If your bot is offline, removed or blocked, PROMO PULSE posts instead: no message is lost.
Emojis
PROMO PULSE custom emojis are copied to your bot so they stay visible, with no reposts or duplicates.
Actions
Pins, AutoMod, roles, channels, sanctions and message deletions are performed by your bot (audit log in its name). It needs the matching permissions and a role placed high enough: the connection test shows what is missing. Otherwise, or if your bot goes down, PROMO PULSE performs the action instead.
Security
The token is encrypted before it is saved, never shown again or shared. The bot must be private and reserved for this server: a bot already on other servers is refused, and if it is later added elsewhere, PROMO PULSE automatically removes it from every unauthorized server.

Tips

  • Premium and Custom Bot are independent: you can have one, the other or both. Cancelling one does not affect the other.
  • Never share your token: not on Discord, not in a ticket, not with support. PROMO PULSE will never ask you for it in a message.
  • If you regenerate the token in the Discord portal, paste the new one in the dashboard: the old one stops working immediately.

Frequently asked questions

Does Premium include Custom Bot?

No. They are two separate subscriptions you can combine: Premium unlocks modules and raises quotas, Custom Bot changes the identity of the bot that posts.

My bot is refused: “present on other servers” or “public bot”.

The bot must be reserved for this server only. Remove it from the other servers or create a new bot, and turn off “Public Bot” in the Discord developer portal.

Why must PROMO PULSE stay on the server?

PROMO PULSE runs the modules; your bot is only used to post under your identity. Without PROMO PULSE, the custom bot does not work.

What happens if the subscription ends?

The custom bot is paused and PROMO PULSE takes over posting again. Your token and settings are kept and come back as soon as you reactivate.

PULSE PLAZA PROMO PULSE’s 3D social lobby, launched as an Activity right inside a Discord voice channel. Server Free /plaza play 5 steps

Permissions: No admin settings: any member can launch the Activity from a voice channel where Discord Activities are allowed.

Commands

  • /plaza playExplains how to launch PULSE PLAZA (name shown in French: /plaza jouer).
  • /plaza statusShows the game service status (in French: /plaza statut).

Step-by-step setup

  1. Join a voice channel: the world is shared with everyone in the channel.
  2. Open the Apps menu (the rocket icon in the channel’s message bar).
  3. Launch PULSE PLAZA: the world opens for the whole channel in a few seconds, with nothing to install.
  4. On the dashboard, the PULSE PLAZA section shows the world status (Open, Maintenance, Closed…) and the message shown to players.
  5. Use /plaza status to quickly check in Discord whether the service is available.

Key settings

No server settings in the game
The game only knows player accounts: there’s nothing to configure for your server.
Your server counts in the game
A server with PROMO PULSE installed boosts your members’ earnings: +25% by default, +15% more when the server is active, up to ×1.55 in total.
Content
Personal apartment (decoration, invitations, lockable door), unlockable looks, credits and tokens earned by playing, live chat and emotes.

Tips

  • During early access, entry may be limited to invited players (private test phase): the message shown to players says so.
  • On phones and tablets, the Activity is displayed in landscape mode.
  • Removing PROMO PULSE from a server doesn’t erase anything your members have built in the world.

Frequently asked questions

I can’t find PULSE PLAZA in the Apps menu.

You need to be in a voice channel, and the server must allow Activities for your role in that channel. Also check with /plaza status that the world is open.

The world shows a waiting screen.

An update or maintenance is in progress; players get back into the world after the restart. PROMO PULSE keeps working normally in the meantime.

Do I need to enable a module for my members to get the bonus?

No, the bonus applies as soon as the bot is installed on your server and your members play from it.

Pulse XP Levels, leaderboards, reward roles and badges based on your members’ text, voice and PROMO PULSE activity. Server Premium: higher limits /xp setup 9 steps

Free module. The multicolor color mode of the image level-up card is Premium only.

Permissions: Configuration and admin commands: Manage Server (or Administrator). rank, profile and leaderboard are open to everyone. The bot needs Send Messages and Embed Links in the level-up channel (and Attach Files in image mode), and Manage Roles with a role placed above the reward roles.

Commands

  • /xp setupOpens the Pulse XP configuration panel in Discord (Manage Server).
  • /xp guide [salon]Posts the public Pulse XP guide (earnings, tiers, roles, badges) in a channel (Manage Server).
  • /xp rank [membre]Shows a member’s level and rank.
  • /xp profile [membre]Shows the detailed XP profile (including badges).
  • /xp leaderboard [type]Global or Saison leaderboard.
  • /xp export [format]Exports statistics as CSV, JSON or TXT (Manage Server).
  • /xp add | remove <membre> <montant>Adds or removes XP (1 to 1,000,000) for a member (Manage Server).
  • /xp reset <membre>Resets a member’s XP (Manage Server).
  • /xp resetall confirmation:CONFIRMERResets all XP on the server (Manage Server).

Step-by-step setup

  1. Enable Pulse XP with the switch on its card in “Manage modules”, then click “Open”.
  2. “XP features” tab (1): pick the sources and options — “Message XP”, “Voice XP”, “Monthly season”, “Level-up announcements”, “Mention the member”, “Leaderboard/stats buttons”.
  3. “Gains and progression” tab: set the earnings (recommended defaults: 8 to 15 XP per message, 60 s cooldown, minimum length 5), then the level difficulty (“Base level XP” 100, “Difficulty” 1.15).
  4. “Announcements and exclusions” tab: choose the “Level-up channel” and the “Level-up format” (Message or Image), then customize the text with the variables {user}, {level}, {server}…
  5. Still in that tab, limit where XP can be earned: “Allowed channels”, “Ignored channels” and “Ignored roles” (e.g. spam channels, bots, muted role).
  6. “Rewards and badges” tab: in “Role rewards”, click “Add”, enter the level and the role to assign; do the same in “Custom badges” with a badge name.
  7. Click “Save Pulse XP” (2).
  8. Optional: pick a “Public guide channel” and click “Publish public guide” (or /xp guide) to explain the system to your members.
  9. For an event, “Temporary multiplier” tab: “Factor” (e.g. 2 to double), “Remaining duration” in hours and “Source”, then save.

Key settings

Message XP min / max, Message cooldown, Minimum length
Random gain per valid message, delay between two gains for the same member (anti-spam) and minimum number of characters. Defaults: 8 / 15 XP, 60 s, 5 characters.
Voice XP / minute, Voice interval, Voice limit / day, Ignore members alone in voice
Voice XP per minute (default 2), check frequency in minutes (5), daily cap (250, 0 = no limit). Keep “Ignore members alone in voice” on to prevent farming.
XP per bump / ad / vote
Bonuses tied to PROMO PULSE activity: 35 per bump, 50 per published ad, 25 per vote (default values).
Base level XP, Difficulty
Base for calculating the XP needed per level; the higher the difficulty, the longer levels take to reach.
Level-up channel, Level-up format
Announcement channel (empty = the announcement goes to the channel where the member wrote). “Message” format (plain text) or “Image” (level-up card with title, description and accompanying text).
Message text
600 characters max. Variables: {user}, {username}, {level}, {xp}, {rank}, {server}, {reward} (+ {badge} in image mode).
Allowed channels / Ignored channels / Ignored roles
If “Allowed channels” contains at least one channel, message XP is only earned there. Ignored channels never give message XP; members with an ignored role don’t earn XP.
Role rewards, Custom badges
At the set level, the bot gives the chosen role or shows the badge on the XP profile.
Temporary multiplier
Factor applied to earnings from the chosen “Source” (All gains, Messages, Voice, Bumps, Ads, Votes, Bonus). Set the duration to 0 to stop it.

Tips

  • Exclude your bot-command and spam channels with “Ignored channels”: XP will better reflect real activity.
  • Create the reward roles before adding them, and place the bot’s role above them in the server settings.
  • Enable “Monthly season” for a leaderboard that resets regularly, on top of the global leaderboard.
  • /xp resetall is permanent: export the stats first with /xp export.

Frequently asked questions

Nobody earns XP.

Check that the module is enabled and “Message XP” is ticked, that the channel isn’t in “Ignored channels” (or is part of “Allowed channels” if that list is filled), that the member doesn’t have an ignored role and that their messages exceed the “Minimum length”. A member only earns once per cooldown.

Level announcements don’t show up.

“Level-up announcements” must be on. Check that the bot can see the “Level-up channel”, send messages and embed links there (and attach files in image mode).

The reward role isn’t given.

The bot needs Manage Roles and its role must be above the reward role. Also check that the configured level has actually been reached.

Voice XP doesn’t go up.

Turn on “Voice XP”. If “Ignore members alone in voice” is on, there must be at least two people in the channel; the “Voice limit / day” may also have been reached.

Pulse Mini Games Ten community mini-games (counting, quiz, word guess, reaction…) with points, leaderboards and reward roles. Server Free /minigames-setup 8 steps

Permissions: Configuration: Administrator (or owner) for /minigames-setup, Manage Server for the dashboard. The bot needs Send Messages, Add Reactions and Manage Messages in the counting channel (to delete wrong messages and pin the panel), and Manage Roles for the record holder role and reward tiers.

Commands

  • /minigames-setupOpens the mini-games configuration panel (Administrator or server owner).
  • /minigames <jeu>Starts a game: rps, quiz, wordguess, mentalmath, reaction, guess, coinflip, dice, emojisequence.
  • /minigames-rpsRock-paper-scissors against Promo Pulse.
  • /minigames-stats [jeu]Shows the server’s public leaderboard, global or per game.

Step-by-step setup

  1. Enable the module from its card or with the “Enable Pulse Mini Games” switch (1) at the top of the section.
  2. “Global settings” tab (2): tick “Enable leaderboards”, pick a “Log channel”, a “Points limit / day” (0 = none) and, if you like, a “Record holder role”.
  3. “Counting game” tab: tick “Enable the counting game”, pick the “Counter channel”, the “Starting number” and the “Increment”.
  4. Set the counter’s protections: “Block double turn”, “Delete wrong messages”, “Warn wrong players”, and the “Reaction when correct” (✅ reaction, discreet temporary message or nothing).
  5. For each other game (Rock-paper-scissors, Quick quiz, Word guess, Mental math, Quick reaction, Guessing game, Coin flip, Magic die, Emoji sequence): tick “Enable…”, pick the “Game channel” and set “Cooldown (seconds)” and “Win points”.
  6. “Rewards” section: fill in “Reward tiers”, one line per tier in the format points=ID_du_rôle (e.g. 100=123456789012345678).
  7. Click “Save Pulse Mini Games” (3).
  8. Test in Discord with /minigames quiz (or another game) in the configured channel.

Key settings

Global settings
Leaderboards, log channel, points limit per day (anti-farm) and role given to the record holder.
Counting game
Turn-based counter with a pinned panel (last validated number and record). Options “Show the record”, “Show the last player”, “Points per correct number”, “Cooldown (seconds)”.
Round-based games (Quiz, Word guess, Mental math, Guessing game, Quick reaction)
Game channel, cooldown and win points; “Round duration” for the quiz, “Minimum / maximum delay” for quick reaction.
Games against the bot (Rock-paper-scissors, Coin flip, Magic die, Emoji sequence)
“Win points”, “Draw points”, “Loss points”; “Restricted channel (optional)” for rock-paper-scissors, “Sequence length” for emojis.
Reward tiers
Role given when a player reaches a points total, across all mini-games.

Tips

  • Use a dedicated channel for the counter: messages that aren’t the right number are deleted if the option is on.
  • Get a role’s ID through Discord’s developer mode (right-click the role › Copy Role ID).
  • A reasonable “Points limit / day” keeps one player from hogging the leaderboard by playing game after game.

Frequently asked questions

The counter doesn’t react.

Check that “Enable the counting game” is ticked, that it’s really the “Counter channel”, and that the bot can read, write, react and manage messages in that channel. “Block double turn” rejects two numbers in a row from the same person.

/minigames-setup denies me access.

This command is limited to administrators and the server owner. Members with only “Manage Server” can use the dashboard.

A game won’t start.

It may be disabled in its tab, started outside its “Game channel”, or still under “Cooldown (seconds)”.

Pulse Monitoring Monitors websites, APIs, TCP ports, databases, Discord bots and game servers, with Discord alerts and a public status page. Server Premium: higher limits /monitoring 8 steps

5 monitored services for free, 25 with Premium. The server’s custom footer also applies to monitoring messages with Premium. Check interval: 5 minutes minimum.

Permissions: Manage Server by default; some actions (view, add a service, manual test, acknowledge an incident, configure) can be opened to specific roles. The bot must be able to View Channel, Send Messages and Embed Links in the status and alerts channels.

Commands

  • /monitoringMonitoring panel in Discord: service status and Add, Configure, Status and Dashboard buttons. Adding opens a form (name, target, category, interval).

Step-by-step setup

  1. Enable the module with the “Enable Pulse Monitoring” switch (1).
  2. “Settings” tab: pick the “Status channel” (status message updated automatically) and the “Alerts channel” (incidents and “Service recovered”, required for notifications). “Incidents channel” and “Logs channel” are optional. Click “Save settings”.
  3. Optional: “Categories” tab › “Create a category” (name, emoji, color) to group Websites, Games, Bots…
  4. Click “Add a service”, pick the “Service type” (Website, HTTPS, API, TCP service, Server, Database, Discord bot, FiveM, Minecraft, Rust, Source / Steam, Custom): the target field adapts to the type.
  5. Fill in the target: check URL for a website, host + port for a server or database, bot ID for a Discord bot, server address (and Query port if needed) for a game. Add a “Public / join link” if you want a Visit / Join button.
  6. Save the service, then click “Test” on its row to check the result right away.
  7. “Public page” tab: tick “Enable public page”, choose a slug (3 characters min., letters, numbers, hyphens) and click “Save public page” to share a /status link that doesn’t need a Discord login.
  8. During maintenance work, use “Maintenance” or “In development” on a service to avoid false alerts; acknowledge incidents from the “Incidents” tab.

Key settings

Status channel / Alerts channel
The status channel only shows the panels (overview, categories, legend); incidents and recoveries go to the alerts channel.
Frequencies
Fixed interval (5 min minimum) for checks and the Discord update; “Degraded threshold” to flag a slow service.
“Infrastructure status” embed
Title, description, “Server icon” as thumbnail, “View live monitoring” button (/status page, external link or hidden) and decorative band (none, top, bottom, top and bottom).
Service options
Category, visibility (hidden = absent from Discord and the public page), “Alerts enabled”, “Show latency / players / address”, announcement shown under the service.
Import / Export
Backs up or restores the config as JSON; dry run is on by default. No token or secret is exported.

Tips

  • For a Discord bot, the monitored bot must be a member of THIS server, otherwise its status can’t be read. Run a new “Test” after any change.
  • For Rust, the Query port is often the game port + 1; for Source, often 27015. Leave it empty for automatic detection.
  • For a database, paste host:port (MySQL 3306, Postgres 5432, Redis 6379).
  • Once the quota is reached, any new service is refused: delete or hide a service, or go Premium (25 services).

Frequently asked questions

I don’t get any alert when a service goes down.

The “Alerts channel” must be set (it’s required for notifications) and the bot must be able to post there. Also check that “Alerts enabled” is ticked on the service and that it isn’t in maintenance.

The status message doesn’t appear in Discord.

Pick a “Status channel” in Settings, save, then check the bot’s permissions (view, send, embed links). If the message was deleted, it’s reposted automatically.

A service is “Offline” even though it works.

Check the target (full URL with https://, correct port), that the server accepts outside connections, then run “Test”. For games, fill in the Query port.

My public page slug is rejected.

It must be at least 3 characters (letters, numbers, hyphens) and unique across all servers: the dashboard shows “Slug already taken”.

Pulse Embed Builder Create, preview, schedule and publish V1 embeds or Embed V2 in your Discord channels. Server Free /embed 8 steps

Permissions: The editor is on the dashboard (Manage Server). The bot must be able to View Channel, Send Messages and Embed Links in the publication channel; to mention @everyone/@here or a non-mentionable role, it needs Mention @everyone, @here, and All Roles.

Commands

  • /embedShows the number of drafts, published embeds and templates, with links to the dashboard editor.

Step-by-step setup

  1. Open the Pulse Embed Builder section, “Create” tab (1). Pick “Embed V1” or “Embed V2”, or start from a template in the “Templates” tab.
  2. “Identity and style” block: give it a “Draft name” (internal name) and a color.
  3. “Discord destination” block: pick the “Publication channel” and, if needed, a “Message or mention” shown above the embed (e.g. @here, @role).
  4. “Message content” block: “Title”, “Description”, “Title URL”, “Author”, “Author icon”, “Thumbnail”, “Main image”, “Add timestamp”.
  5. Add “Custom fields” (Name, Value, Inline) and “Buttons” (Text, Link to open, Color, optional Emoji) with “Add”.
  6. Check the result in “Live Discord preview” (Desktop / Mobile).
  7. Click “Save” (2) to save the draft, then “Send a test” or “Publish”.
  8. To send it later: “Schedule” tab, pick the embed and the “Publish at” date.

Key settings

Embed V1 / Embed V2
V1 = classic Discord embed. V2 = container with title, text, separator, image, field and button blocks, in the order you choose (move each block up / down).
Variables
Replaced when sent, for example {server_name}, {server_icon}, {member_count}, {date}, {time}.
Buttons
Gray = direct link in 1 click. Blue, Green, Red = color visible on Discord, and on click the member gets a private card with the link.
Actions
Save, Publish (or Update if already published), Send a test, Duplicate, Create a template, Archive, Delete.
Import / Advanced JSON
Paste a Discord payload or a Pulse Embed Builder configuration to apply it to the editor; “Export” to get it back.

Tips

  • A new embed is only created when you click “Save”: until then, nothing is stored.
  • Editing an already published embed and saving updates the existing message on Discord: duplicate it if you want to keep the original.
  • The “My images” tab lists the server’s visuals; click an image to copy its URL and paste it into “Main image” or “Thumbnail”.

Frequently asked questions

“Publish” does nothing or returns an error.

Check that a “Publication channel” is selected and that the bot can view, send and embed links there. Image URLs must start with https://.

My @everyone mention doesn’t notify anyone.

The bot needs the “Mention @everyone, @here, and All Roles” permission in that channel.

Why does my colored button open a card instead of the link?

Discord only allows direct links on gray buttons. Pick the Gray color for a one-click link.

Server tag role Automatically gives a role to members who display your server’s tag on their Discord profile. Server Free /tag 7 steps

Permissions: Manage Server to configure. The bot needs Manage Roles, with its role placed above the tag role (and that permission for “Create the role automatically”).

Commands

  • /tagOpens the tag role panel and tries to detect the server tag if it isn’t detected yet (Manage Server).

Step-by-step setup

  1. In your server’s Discord settings, turn on the Server Tag feature and pick a tag.
  2. Enable the “Server tag role” module from its card, then open it.
  3. Click “Detect tag”: the “Expected tag” is read automatically from Discord (it can’t be typed by hand).
  4. “Role configuration” tab (1): pick the “Role to assign”, or click “Create the role automatically”.
  5. Leave “Automatic removal” on to remove the role from members who no longer display the tag.
  6. Click “Save tag role” (2): this button is only available once a tag is detected.
  7. Click “Sync online members” to apply the role right away to connected members, then check the “Recent checks” tab.

Key settings

Role to assign
Only one tag role per server. An existing role or one created by PROMO PULSE.
Expected tag
Detected automatically from Discord; run “Detect tag” again if you change your tag.
Automatic removal
Removes the role as soon as an online member stops using the tag. Recommended: on.
Current status / Recent checks
Status, chosen role, detected tag, last sync and latest profiles checked (online members first).

Tips

  • The “Detect tag” button stays usable even when the rest of the module is locked.
  • Checks prioritize online members: an offline member may get their role a little later.
  • A “Tag missing” entry in the checks doesn’t always mean a change: logs are only sent on a real change.

Frequently asked questions

The dashboard shows “Discord server tag not detected”.

Turn on Server Tag in the Discord settings, pick a tag, then click “Detect tag”.

Members with the tag don’t get the role.

Check that the bot has Manage Roles and that its role is above the tag role, that the config is saved, then run “Sync online members”.

I can’t click “Save tag role”.

The button only unlocks once a server tag is detected: run “Detect tag” first.

Game shops Automatically posts shops, cosmetic rotations, offers and events for many games (Fortnite, Warframe…). Server Free /shops 7 steps

Permissions: Manage Server to configure. The bot must be able to View Channel, Send Messages, Embed Links and Attach Files in the publication channel; Manage Channels if you turn on “Create the channel automatically”.

Commands

  • /shopsShops configuration panel for managers (Manage Server); public summary for other members.

Step-by-step setup

  1. Enable “Game shops” from its card, then open the section.
  2. “Activation and posting” tab (1): pick the “Publication channel” (text or announcement channel) and the “Frequency” (Daily, Weekly or Manual).
  3. No channel ready? Turn on “Create the channel automatically” and enter the “Automatic channel name” (e.g. game-shops).
  4. “Available games” tab: turn on the games to follow. The badge next to the name shows how reliable the source is (Stable, Beta, External source, API key, Manual mode…).
  5. “Channels per game” tab: keep “Use the global channel” or pick a dedicated channel per game, then click “Test”.
  6. “Notification” tab: “Mention mode” (No mention, Mention a role, @here, @everyone) and, for role mode, the “Discord role”.
  7. Click “Save game shops” (2), then check the “Summary” tab.

Key settings

Frequency
Automatic posting schedule: Daily (recommended for Fortnite), Weekly or Manual.
Available games
Games with a fragile source are flagged (external source, manual): favor games marked “Stable” for regular posts.
Channels per game
Dedicated channel per game, or the global channel. The “Test” button sends a trial post.
Sources
Locked to PROMO PULSE’s built-in sources (automatic mode) to keep posts stable.
Summary
Followed games, shops sent, last check, last announcement, global channel and dedicated channels, with any errors.

Tips

  • If the Summary shows “Publication channel not found or missing permissions”, pick a channel and check the bot’s permissions in it.
  • Avoid @everyone for a daily post: use a role that players sign up for instead.
  • With the “Manual” frequency, nothing is posted automatically: use “Test” to post.

Frequently asked questions

No shop is posted.

Check that the module is enabled, that a publication channel (or a dedicated channel) is selected, that the game is ticked and that the frequency isn’t “Manual”. Then check the bot’s permissions and the “Summary” tab.

A game marked “Manual mode” or “External source” doesn’t post anything.

These games don’t have a reliable automatic source; posts may be missing or incomplete. “Stable” games are the most reliable.

Members see /shops but can’t change anything.

That’s normal: without “Manage Server”, /shops only shows a public summary.

Pulse Live Alerts Automatically announces your creators’ live streams and new videos (YouTube, Twitch, Kick, TikTok…), with duplicate protection. Server Premium: higher limits /live 8 steps

1 alert for free, up to 15 with Premium. Alerts beyond the quota are kept and become active again with Premium.

Permissions: Manage Server to configure. The bot must be able to View Channel, Send Messages and Embed Links in the alert channels, and Mention @everyone, @here, and All Roles if you mention a non-mentionable role or @everyone.

Commands

  • /liveAlerts panel: list, help and link to the dashboard; managing them requires “Manage Server”.

Step-by-step setup

  1. Enable “Pulse Live Alerts” from its card, then open the section.
  2. “Activation and limits” tab (1): pick the “Default channel”, the “Default mention” and, if needed, the “Default role” and the “Default message”.
  3. “My alerts” tab: in “Add a platform”, click the creator’s platform (YouTube, Twitch, Kick, TikTok, RSS / Atom…).
  4. Fill in the alert: “Alert name”, “Creator”, “Creator URL” (e.g. https://www.youtube.com/@chaine), “Channel ID” if asked, and “Type” (Lives + videos, Lives, New videos, Replays / VOD).
  5. Optional: “Dedicated channel”, “Mention” and “Role to mention”, “Message before embed”, “This alert color”.
  6. Keep “Ignore first sync” ticked so old videos aren’t reposted, and check that “Active alert” is ticked.
  7. Click “Save Pulse Live Alerts” (2), then “Test” in the alert to see how it looks.
  8. If you like, customize the “Embed templates” tab (title, description and live / video button) with help from the “Variables” tab.

Key settings

Default channel / Default mention / Default role
Used by any alert without its own channel or mention. Possible mentions: No mention, Mention a role, @here, @everyone, Custom message.
Check frequency
Automatic: the bot picks the fastest reasonable rate based on the platform, the load and Premium.
Anti-spam cooldown / Re-announce live after
Per alert: minimum delay between two notifications (default 15 min) and delay before announcing the same live again (default 6 h).
Optional RSS/Atom feed
For some platforms, a direct feed URL makes detection more reliable.
Embed templates and Variables
Variables such as {creator_name}, {platform}, {live_title}, {category}, {viewer_count}, {video_title}, {published_at}, {role_mention}.
History shown
Number of entries kept in the notification and log history (10 to 200, default 40).

Tips

  • For YouTube, the channel URL, the @handle or the UC... ID all work.
  • Some platforms are “Available with limits” or “Integration in progress”: their badge is visible in the “Platforms” tab.
  • “Duplicate” an alert to quickly follow the same creator on another platform (within the quota).

Frequently asked questions

The bot doesn’t post anything when the creator goes live.

Check that the alert is an “Active alert”, that the Type covers lives, that a channel (dedicated or default) is set and that the bot can send messages and embed links there. Use “Test”, then look at the “History” tab.

I can’t add a second alert.

The free plan allows 1 alert. Go Premium to set up to 15.

Old videos were all posted at once.

Turn on “Ignore first sync” before saving a new alert.

The role mention doesn’t notify.

The role must be mentionable, or the bot must have the “Mention @everyone, @here, and All Roles” permission.

Premium radio Streams a radio station non-stop in a voice channel as soon as at least one member is there. Server Premium /radio 6 steps

Premium servers only. One radio channel per server.

Permissions: Manage Server to configure. The bot must be able to View Channel, Connect and Speak in the radio voice channel, and Manage Channels to create the channel automatically and set it to listen-only.

Commands

  • /radioRadio panel: pick or create the voice channel, pick the station or a custom stream, enable, disable or stop playback (Manage Server).

Step-by-step setup

  1. Activate Premium for the server, then enable “Premium radio” with the switch on its card.
  2. Pick the radio’s “Voice channel”, or click “Create a radio channel automatically” (in Discord: the “Create channel” button in /radio).
  3. Pick the “Station”: Fun Radio, Skyrock, NRJ, RTL2, or “Custom URL”.
  4. For a custom URL, paste the direct HTTP/HTTPS URL of the radio stream into “Audio stream” (not a web page).
  5. Click “Save radio”: the status changes to “Ready to stream”.
  6. Join the voice channel: the bot connects and starts playback automatically.

Key settings

Voice channel
Only one radio channel per server. It’s automatically set to listen-only for listeners.
Station / Audio stream
Preset or custom stream URL (direct link to the audio stream).
Automatic behavior
The bot only streams when the channel has at least one member and leaves voice after 5 minutes with nobody there; this delay is fixed.

Tips

  • Use a voice channel dedicated to the radio: members there are listen-only.
  • If a custom stream doesn’t work, test the URL in an audio player: it must return the sound directly (often .mp3, .aac or an Icecast/Shoutcast stream).
  • The “Stop” button in /radio stops the current playback without deleting the configuration.

Frequently asked questions

The bot doesn’t join the voice channel.

Check that Premium is active, that the radio is enabled and saved, that a voice channel is selected and that the bot has the “View Channel”, “Connect” and “Speak” permissions in that channel. It only joins if a member is present.

The bot is connected but there’s no sound.

The stream URL is probably invalid or not a direct audio stream. Pick a preset to test, then fix your “Audio stream”.

Can we have several radios?

No, only one radio channel can be active per server.

Free games Automatically announces free games and limited-time offers (Epic, Steam, GOG, Prime Gaming…) based on your filters. Server Premium /free 7 steps

Premium servers only.

Permissions: Manage Server to configure. The bot must be able to View Channel, Send Messages and Embed Links in the announcement channel, and Create Public Threads if automatic threads are on.

Commands

  • /freeConfiguration panel (channel, platforms, stores, offer types, filters, style, mention, test) for “Manage Server”; shows the current offers to other members.

Step-by-step setup

  1. Activate Premium for the server, then enable “Free games” with the switch on its card.
  2. “Activation and posting” block: pick the “Announcement channel” (text or announcement) and the “Checking” interval in minutes (60 by default, 30 minimum).
  3. “Sources and offer types” block: tick the Platforms (PC, Xbox, PlayStation, Nintendo, Mobile), the Stores (Steam, Epic Games, GOG, Itch.io, Ubisoft Connect, EA App, Prime Gaming…) and the Offer types (Free to keep, Free weekends, DLC, Demos, Betas…).
  4. “Advanced filters” block: fine-tune with “Allowed genres”, “Blocked genres”, “Blocked keywords”, “Minimum rating”, “Minimum price before promotion”, “Exclude demos / free-to-play / adult games” or “Only 100% free offers”.
  5. Pick the “Mention mode” (No mention, Custom role, Premium custom mention) and the “Role to mention”.
  6. “Premium style” block: “Style” (Compact, Full, Gaming, Minimalist, Premium), “Custom title”, “Announcement currency” (EUR or USD) and the Free Games embed color.
  7. Click “Save free games”, then use the “Test” button in /free to see an announcement.

Key settings

Checking
Automatic interval between two offer searches (30 to 1440 minutes).
Announcement options
“Automatic threads” (discussion opened after posting), “Daily summary”, “Expiration alerts”.
Advanced filters
Avoid announcements that don’t fit your community (genres, keywords, rating, original price, demos, free-to-play, adult games).
Free Games embed color
“Fixed color” and “Color mode”, applied only to free games announcements.
Statistics
Offers sent, last check and last announcement.

Tips

  • Tick “Only 100% free offers” if you want to skip simple discounts.
  • Too many filters can block every announcement: start broad, then narrow it down.
  • Each announcement offers “Claim game” and “Open store” buttons for your members.

Frequently asked questions

No announcement is posted.

Check Premium, that the module is enabled, that the “Announcement channel” is set and that the bot can send messages and embed links there. Also make sure your filters (platforms, stores, types, genres) don’t exclude every offer.

I see the offers with /free but not the configuration panel.

Configuration requires the “Manage Server” permission; without it, /free only shows the current offers.

Original prices are in the wrong currency.

Change the “Announcement currency” (EUR or USD) in the Premium style block, then save.

Community family

Community

Invites, boosts, automatic roles, announcements, stat channels and temporary voice channels, events, giveaways and a server FAQ.

Community family All the modules that liven up and grow your community: invites, boosts, automatic roles, temporary channels, events, giveaways and FAQ. Community Premium: higher limits /invit 6 steps

Most modules can be used for free; some have higher quotas with Premium (Status Roles rules 1→20, Game Roles games 3→50, active events 5→50, active giveaways 3→50, Smart Ping 1→25 rules).

Permissions: All of the family’s configuration commands are limited by default to members with Manage Server (or Administrator / owner). Only /invit-stats and /voice are open to members.

Commands

  • /invitPulse Invites panel (link to the dashboard, leaderboard, help).
  • /boostPulse Boost Alerts panel (enable, disable, send a test).
  • /statusrolesPulse Status Roles panel.
  • /gamerolesPulse Game Roles panel.
  • /autopublishPulse Auto Publish panel.
  • /smartpingPulse Smart Ping panel.
  • /stats-channelsPulse Stat Channels panel.
  • /tempchannelsPulse Temp Channels panel (admins).
  • /eventPulse Events panel.
  • /giveawaysPulse Giveaways panel.
  • /faqPulse FAQ panel.

Step-by-step setup

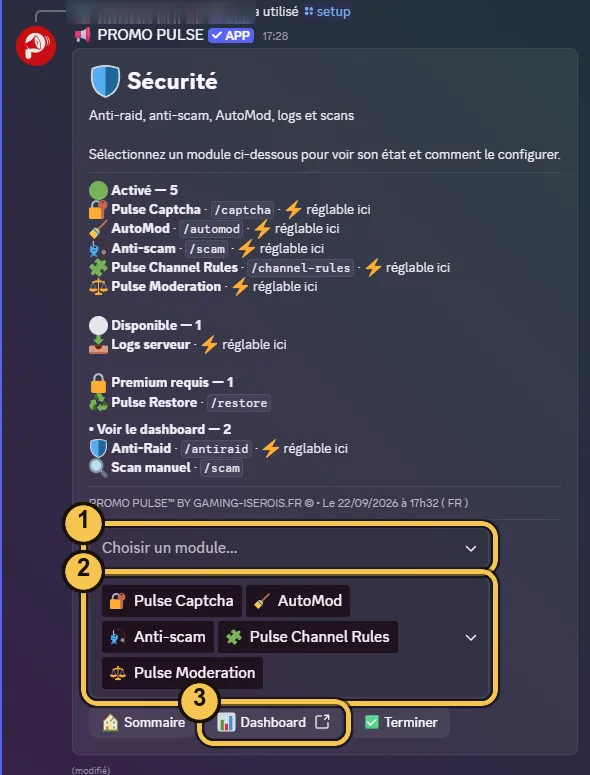
  1. Open the Community family panel from Discord (Promo Pulse’s configuration panel).
  2. Use the 1 “Choose a module…” menu to show a specific module’s page (Pulse Invites, Pulse Boost Alerts, Pulse Status Roles…).
  3. Or click one of the shortcut buttons 2 to go straight to the module you want.
  4. Click the 3 Dashboard button to open the server’s full configuration on the website.
  5. On the dashboard, enable each module with its switch, then configure it and click “Save”: a module that isn’t enabled keeps its settings hidden.
  6. Then check the bot permissions each module needs (see the guides below) before testing.

Tips

  • Each module is configured independently: only enable the ones you need.
  • Modules that give roles (Status Roles, Game Roles, Events) require Promo Pulse’s role to be placed above the roles to assign in Server Settings → Roles.

Frequently asked questions

My members can’t see the configuration commands, is that normal?

Yes. By default they’re limited to members with Manage Server. You can adjust this in Server Settings → Integrations → Promo Pulse.

Where are the detailed settings?

On the website dashboard: the Discord commands mostly show a status panel with a Dashboard button.

Pulse Invites Track who invited whom, welcome people and say goodbye automatically, with a leaderboard of top inviters. Community Premium: higher limits /invit 9 steps

The module is free. Only the multicolor color mode for welcome/goodbye embeds is limited to Premium servers.

Permissions: Configuration: Manage Server, Administrator or owner. Bot: Manage Server (Discord requires it to read the invite list and the vanity URL), View Channel + Send Messages in the welcome/goodbye channels, and View Audit Log if you want a bot’s addition credited to the person who added it.

Commands

  • /invitModule status panel (welcome, goodbye, tracking, vanity, Promo Pulse invites, leaderboard, bots) with the “Dashboard”, “View stats” and “Help” buttons. Requires Manage Server.
  • /invitesFull panel: joins, leaves, tracked invites, a button to resync the invite cache and access to the leaderboard. Requires Manage Server.
  • /invit-statsPaginated invite leaderboard (invited members, still here, left, vanity, Promo Pulse invites). Available to all members if the leaderboard is enabled.

Step-by-step setup

  1. Tick “Enable Pulse Invites (invite tracking)” to show the settings.
  2. In the welcome block, turn on “Send a welcome message” and pick the “Welcome channel”.
  3. Pick the “Message format”: “Text (Components V2 embed)” or “Automatically generated image”. In image mode, also pick the “Banner layout (image mode)” and, if you like, “Ping the new member”.
  4. Write the “Welcome message” with the variables ({user}, {username}, {server}, {memberCount}, {inviter}, {inviteCode}). You can add a “Custom image or banner” (text mode only).
  5. Check how it looks in the “Live Discord preview”, then click “Send a test to the channel”.
  6. Do the same in the goodbye block: “Send a departure message”, “Departure channel”, format and “Departure message”.
  7. Turn on the tracking options you want: “Detect arrivals via custom URL (vanity)”, “Track invites created by Promo Pulse”, “Enable the /invit-stats leaderboard” and possibly “Count bots too…”.
  8. Click 1 “Save”.
  9. On Discord, run /invites, then the resync button so the bot loads all existing invites.

Key settings

Message format
“Text (Components V2 embed)”: up to 800 characters. “Automatically generated image”: banner with avatar, server name and inviter; the text is limited depending on the layout (140 to 260 characters).
Banner layout (image mode)
Classic, Aurora (large visual), Compact or Minimal. Aurora fits the most text.
Detect arrivals via custom URL (vanity)
Counts joins through the server’s custom link. Only useful if your server has a vanity URL.
Track invites created by Promo Pulse
Also counts joins through invites generated by the bot.
Enable the /invit-stats leaderboard
Makes /invit-stats usable by members. When off, the command replies that the leaderboard is disabled.
Count bots too
Includes bots in the stats, credited to the person who added them (requires View Audit Log). Leave it off for a “human” leaderboard.

Tips

  • Without the Manage Server permission, the bot can’t read invites: joins won’t be credited to an inviter.
  • Invites created while the bot was offline are picked up by the /invites resync.
  • In image mode, keep the message short: text that’s too long is cut to fit on the banner.

Frequently asked questions

The inviter shows as “Unknown”, why?

The bot couldn’t compare the invite counters: check that it has Manage Server, then resync via /invites. Vanity joins are only recognized if the vanity option is ticked.

/invit-stats replies that the leaderboard is disabled.

Enable the module AND the “Enable the /invit-stats leaderboard” option, then save.

The welcome message doesn’t arrive.

Check that “Send a welcome message” is ticked, that a channel is selected, and that the bot can view and write in that channel. Test with “Send a test to the channel”.

Pulse Boost Alerts Automatically celebrates every new server boost with a custom message and the list of your booster perks. Community Premium: higher limits /boost 9 steps

Free. The custom footer and multicolor color mode are limited to Premium servers.

Permissions: Configuration: Manage Server, Administrator or owner. Bot, in the notification channel: View Channel, Send Messages and Embed Links.

Commands

  • /boostModule panel: status, enable/disable and send a test notification. Requires Manage Server.

Step-by-step setup

  1. Tick “Enable Pulse Boost Alerts”.
  2. Using the tabs 1, go to “Channels & display” and pick the “Notification channel”. Add a “Staff log channel (optional)” if needed.
  3. Pick the “Display mode”, then tick what to show: “Show the boosting member”, “Show total boost count”, “Show server level”, “Show booster perks”.
  4. Tick “Log removed boosts” if you want to be told when a member stops boosting.
  5. In “Message & perks”, write the “Custom message” (2,000 characters max) with the variables {user}, {username}, {server_name}, {boost_count}, {boost_level}, {booster_rewards}, {datetime}.
  6. Fill in the “Thank-you message (in the embed)” and, if you have a dedicated page, the “Perks URL (button, optional)”.
  7. In “Booster perks”, click “Add a perk” for each perk (an emoji + a short description).
  8. Pick the color, check the “Live Discord preview”, then click “Send a test to the channel”.
  9. Click 2 “Save”.

Key settings

Display mode
“Plain text”, “Modern Embed V2”, “Premium Embed V2” (default), “Visual banner” or “Banner + Premium Embed V2”.
Staff log channel (optional)
Receives a record of each boost (and removals if the option is ticked).
Show booster perks
Shows the list built in “Booster perks”; it’s also what {booster_rewards} is replaced with.
Notification footer
Fixed prefix “💗 Pulse Boost Alerts”, followed by the server’s Premium custom footer (otherwise the bot’s).

Tips

  • Use the test button in /boost or on the dashboard: no need to wait for a real boost to check the result.
  • Keep a notification channel that everyone can see so the thank-you is public.

Frequently asked questions

The test fails.

The bot must be able to view the channel, send messages and embed links in the notification channel. Also check that a channel is actually selected.

A boost wasn’t announced.

Check that the module is enabled and saved. The bot detects the boost when Discord updates the member (start of the boost): a member who was already boosting before activation isn’t announced again.

Pulse Status Roles Automatically gives a role to members who show your link or a specific text in their Discord custom status. Community Premium: higher limits /statusroles 9 steps

Free: 1 rule. Premium: up to 20 rules. Up to 5 roles per rule.

Permissions: Configuration: Manage Server. Bot: Manage Roles, and its role must be placed above the roles to assign. Detection relies on Discord presences (presence intent): an invisible or offline member doesn’t expose their status.

Commands

  • /statusrolesModule panel with the “Add rule” (quick form), “Test” (self-test on your own status), “Stats” and “Dashboard” buttons. Requires Manage Server.

Step-by-step setup

  1. Enable the module with the 1 “Enable Pulse Status Roles” switch.
  2. Open the “Rules” tab, then the “Create a rule” block.
  3. Enter the “Rule name” and the “Text to detect” (e.g. promopulse.fr).
  4. Pick the “Detection mode”: for a link, choose “Smart domain / URL” and keep “Strict domain mode” ticked.
  5. In “Roles to assign”, click the roles you want (5 max) — no need to paste IDs.
  6. Set the “Minimum duration before grant”, the “Removal delay” and the “Priority”, then create the rule.
  7. In the “Settings” tab, pick the “Log channel”, the “Offline mode” and the “Rule priority”, then click “Save”.
  8. Click “Scan visible members” to apply the rules to online members right away.
  9. Check the result in the “Members” and “Activity” tabs.

Key settings

Detection mode
“Exact match”, “Contains text”, “Starts with”, “Ends with”, “Smart domain / URL” (recognizes www, https, uppercase and blocks fake domains) or “Safe regex” (advanced admins).
Minimum duration before grant
Immediate, 1, 5 or 10 minutes, or 1 hour. A few minutes prevent “status shown for 10 seconds” abuse.
Removal delay
Immediate, 5 min, 30 min, 1 h or 24 h after the text disappears.
Offline mode
Remove immediately, after a delay, only if the status is confirmed missing, keep the role while offline, or never remove while offline. Recommended: a mode that keeps the role while offline.
Rule priority
All matching rules, only the highest-priority one, or one rule blocks the following ones.
Test mode
Detects and logs without changing roles: ideal for validating a new rule.
Remove the role if the text disappears
Applies each rule’s removal delay; when unticked, the role is kept for good.

Tips

  • An invisible or offline member doesn’t show their status to the bot: without a suitable offline mode, they could lose their role.
  • Start in “Test mode”, check the Activity tab, then turn test mode off.
  • On Free, there’s only one rule: put several roles in it if needed (up to 5).

Frequently asked questions

The activity shows “Grant failed”.

The bot doesn’t have Manage Roles or the target role is above (or at the same level as) Promo Pulse’s role. Move the bot’s role up in Server Settings → Roles.

A member has the link in their status but doesn’t have the role.

Check that they aren’t invisible, that the minimum duration has passed and that test mode is off, then run “Scan visible members”. “Test” in /statusroles shows what the bot sees on your own status.

I can’t create a second rule.

The Free plan is limited to 1 rule; Premium allows 20.

Pulse Game Roles Automatically assigns a role based on the game your members are playing on Discord. Community Premium: higher limits /gameroles 8 steps

Free: 3 configured games. Premium: up to 50. Up to 5 roles and 20 aliases per game.

Permissions: Configuration: Manage Server. Bot: Manage Roles, with its role above the game roles. Detection relies on the “Playing” activity from Discord presences: the member must share their activity and not be invisible.

Commands

  • /gamerolesModule panel with “Add game” (quick form), “Test”, “Stats” and “Dashboard”. Requires Manage Server.

Step-by-step setup

  1. Enable the module with the 1 “Enable Pulse Game Roles” switch.
  2. The quickest way: “Presets” tab (“Game library”), search for your game, then “Accept — create @Role” to create the role automatically, or “Decline — choose an existing role” followed by “Add with this role”.
  3. For a game that isn’t in the library: “Games” tab, “Add a game” block. Enter the “Rule name” and the “Game name to detect”.
  4. Add the “Aliases” separated by commas (e.g. launchers or variants) and keep the “Detection mode” on “Multiple aliases” (recommended).
  5. Select the “Roles to assign”, then set “Minimum duration before grant”, “Removal delay” and “Priority”.
  6. “Settings” tab: “Log channel”, “Offline mode”, “Rule priority”, “Multiple games” and the options (DMs, playtime, test mode), then “Save”.
  7. Click “Scan visible presences” to apply the rules right away.
  8. Check the “Members” and “Activity” tabs.

Key settings

Detection mode
“Exact match”, “Contains text”, “Starts with”, “Multiple aliases” (recommended) or “Safe regex”.
Minimum duration before grant
Immediate, 1, 5, 10 or 30 minutes of play before getting the role.
Removal delay
Immediate, 5 min, 15 min, 1 h or 24 h after the game stops. A long delay avoids removing/adding the role every session.
Multiple games
“All detected games”, “Only the first game” or “By rule priority”.
DM when the role is added / DM when the role is removed
Sends the member a direct message. Leave it off if you want to stay discreet.
Track playtime
Estimate based on the presences received.
Detect Streaming / Detect Competing
Advanced options for activities other than “Playing”.

Tips

  • Think about aliases: the same game can show up under several names depending on the launcher.
  • Use “Test mode” to check detections before touching roles.

Frequently asked questions

The game isn’t detected.

The member must display their game activity on Discord (activity privacy setting) and not be invisible. Also check that the reported name matches your rule’s name or one of its aliases.

“Grant failed” in the activity.

Give the bot Manage Roles and place its role above the game roles.

The create button is grayed out.

You’ve reached the limit: 3 games on Free, 50 on Premium.

Pulse Auto Publish Automatically publishes messages from your announcement channels to following servers, with no manual click. Community Free /autopublish 7 steps

Permissions: Configuration: Manage Server. Bot, in each announcement channel: View Channel, Manage Messages and Read Message History (Discord requires Manage Messages to publish another member’s message).

Commands

  • /autopublishModule panel with “Add channel”, “Test”, “Statistics” and “Dashboard”. Requires Manage Server.

Step-by-step setup

  1. Make sure you have at least one Announcement channel on your server (otherwise no channel is offered).
  2. Enable the module with the 1 “Enable Pulse Auto Publish” switch.
  3. “Channels” tab, “Add a channel” block: pick the “Announcement channel”.
  4. Pick the “Filter mode” (e.g. “All messages” or “Webhooks only”), then click “Add channel”.
  5. If needed, open the added channel to fine-tune it: allowed webhooks/bots/roles/users, “Required keywords”, “Ignored keywords”, “Require an embed”, “Require an image / attachment”, “Require a link”, then “Save channel”.
  6. “Settings” tab: pick the “Log channel”, leave “Test mode” unticked in production, then “Save”.
  7. Post a message in the announcement channel and check the “Logs” tab (published, or the reason it was skipped).

Key settings

Filter mode
“All messages”, “Webhooks only”, “Selected webhooks”, “Selected bots”, “Selected roles” or “Selected users”.
Webhook names
Also accepts webhooks whose name matches (e.g. Shop, WordPress…), even if their ID changes.
Content filters
Required keywords (at least one must be present), ignored keywords, and requiring an embed, an image/attachment or a link.
Automatic delay
Global delay managed by Promo Pulse (can’t be changed) to respect Discord’s limits and let embeds load.
Test mode
Validates the configuration without actually publishing: handy for checking filters.

Tips

  • Discord limits the number of publications per announcement channel: the logs show “Rate limit reached” if you go over.
  • A message deleted before publication is skipped (“Message deleted before publication”).

Frequently asked questions

Messages aren’t published.

Look at the “Logs” tab: it gives the reason (Missing permission, Incompatible channel, filter not met, Test mode…). Most often the bot is missing Manage Messages in the channel.

My channel doesn’t appear in the list.

Only Announcement channels can be published. Convert your channel to an announcement channel in its Discord settings.

Pulse Smart Ping Automatic mentions when a member joins or on a schedule, controlled ghost pings, with anti-abuse quotas. Community Premium: higher limits /smartping 9 steps

Free: 1 rule, role/member mentions (4 role pings per day), minimum frequency 24 h, max join delay 5 min. Premium: 25 rules, @everyone (3/day) and @here (6/day), ghost mode (20/day), minimum frequency 1 h.

Permissions: Configuration: Manage Server or Administrator. Bot, in the target channel: View Channel and Send Messages; Mention @everyone, @here, and All Roles for @everyone/@here (and for non-mentionable roles); Manage Messages + Read Message History for ghost mode.

Commands

  • /smartpingModule status panel (rules, statistics) with access to the dashboard. Requires Manage Server.

Step-by-step setup

  1. Enable the module with the 1 “Enable Pulse Smart Ping” switch.
  2. “Settings” tab: pick the “Staff log channel” and the “Timezone”, then “Save Pulse Smart Ping”.
  3. “Rules” tab → “New rule”: enter the “Rule name” and the “Target channel”.
  4. Pick the “Mention type” (specific role, several roles, member, new member, no mention; @everyone/@here with Premium).
  5. Turn on “Custom message” and write the “Message text” with the variables ({mention}, {user}, {username}, {display_name}, {guild_name}, {member_count}, {channel}, {date}, {time}).
  6. Pick the “Trigger type”: “Member join” (with “Delay after join (seconds)”) or “Scheduled” (“Frequency”, “Interval”, “Time”, days…).
  7. Set the “Cooldown (seconds)” and, with Premium, “Ghost mode” with its “Ghost mode deletion”.
  8. For a join rule, keep “Ignore bots”, “Only if the member is still in the guild” and “Once per member”; tick “Only if captcha is passed” if you use Pulse Captcha.
  9. Tick “Test mode” for a first try, click “Create the rule”, then check the “Logs” tab before turning test mode off.

Key settings

Frequency
Every hour, every X hours, every day, every X days, certain days of the week or every month (day of the month between 1 and 28).
Ghost mode
Deletes the message after the chosen delay, keeping the staff logs. Premium only.
Global test mode
Neutralizes @everyone and @here and doesn’t send any real ghost ping.
Safe mode
Limits concurrency and logs errors in more detail. Leave it on.
Timezone
Used for scheduled pings and daily quotas: set your community’s timezone.

Tips

  • Daily quotas protect your members: beyond them, pings are blocked until the next day.
  • To greet newcomers after the captcha, combine “Member join”, a short delay and “Only if captcha is passed”.

Frequently asked questions

I can’t pick @everyone or turn on ghost mode.

These options are Premium only.

The ping is sent but nobody is notified.

Check that test mode (the rule’s or the global one) is off. For @everyone/@here or a non-mentionable role, the bot needs Mention @everyone, @here, and All Roles in the channel.

The ghost message isn’t deleted.

The bot is missing Manage Messages or Read Message History in the target channel.

Pulse Stat Channels Shows your server’s statistics in locked voice channels and dynamic categories. Community Free /stats-channels 8 steps

Permissions: Configuration: Manage Server. Bot: Manage Channels (creating and renaming) and Manage Roles/permissions to lock the voice channels (deny Connect to @everyone).

Commands

  • /stats-channelsModule panel with “Auto setup”, “Repair permissions”, “Test”, “Refresh” and “Dashboard”. Requires Manage Server.

Step-by-step setup

  1. Tick “Enable Pulse Stat Channels”.
  2. The easiest way: in “Automatic setup”, click “🚀 Automatic setup”. The bot creates a STATS category, locked voice counters (status, offline, members, bots, boosts) and a rotation.
  3. Using the tabs 1, open each “Counter”: tick “Enable this counter”, pick the “Statistic type” and the “Channel type” (Voice channel or Category).
  4. Leave “Existing channel (optional)” on “Create automatically” or pick an existing channel.
  5. Customize the “Template” (100 characters max) with the variables and check the “Preview”.
  6. To cycle through several texts, set up a “Rotation”: “Target type”, “Channel / category”, “Order” and “Texts (one per line)”.
  7. In “Overview”, pick the “Update mode” and keep “Automatically lock created voice channels” ticked.
  8. Click 2 “Save”, then “🔄 Refresh now” for a first update.

Key settings

Statistic type
status, offline, members, humans, bots, boosts, boost_level, category or custom (free template).
Update mode
hybrid, event, scheduled or manual. The interval can’t be changed: Discord only allows about 2 channel renames per 10 minutes.
Lock the voice channel (deny Connect)
Stops members from joining the voice counter. Keep it on.
Repair permissions on activation
Reapplies the channel lock when you enable the module.
Template
Variables such as {member_count}, {human_count}, {bot_count}, {online}, {idle}, {dnd}, {offline}, {boost_count}, {boost_level}, {joins_today}, {server_name}. An unknown variable or a name that’s too long is flagged in the preview.

Tips

  • Counters don’t change every second: that’s a Discord limit on renaming channels, not a bug.
  • Presence statistics (online, idle, do not disturb) depend on the presence data Discord sends to the bot.

Frequently asked questions

My counters stopped updating.

Wait a few minutes (Discord rename limit). If nothing changes, check that the bot has Manage Channels, then use “Test” and “Refresh now”.

Members can join the stat channels.

Click “🔄 Repair permissions”: the bot puts the Connect denial back. It needs permission to manage the channel’s permissions.

Pulse Temp Channels A member joins a “hub” channel and gets their own temporary voice channel, which they manage with /voice. Community Free /tempchannels 9 steps

Permissions: Configuration: Manage Server. /voice can be used by the channel owner (each subcommand can be disabled). Bot: Manage Channels, Move Members and channel permission management in the target category (it gives the owner rights over their channel).

Commands

  • /tempchannelsModule admin panel (hubs, active channels, cleanup, statistics, dashboard). Requires Manage Server.
  • /voice ownerSee who owns the temporary channel.
  • /voice renameRename your temporary voice channel.
  • /voice limitChange the user limit.
  • /voice lock / unlockLock or unlock your channel.
  • /voice hide / revealHide or reveal your channel.
  • /voice kick / ban / unbanKick, ban or unban a member from your channel.
  • /voice inviteInvite a member to your channel.
  • /voice transferTransfer ownership to another member.
  • /voice claimClaim a channel whose owner is no longer active.
  • /voice statusSet a channel status or description.
  • /voice cleanDelete inactive temporary channels (requires Manage Server).

Step-by-step setup

  1. On Discord, create a voice channel to act as the hub (e.g. “➕ Create your channel”) and a category for the temporary channels.
  2. Tick “Enable Pulse Temp Channels”.
  3. In “General settings”, pick the “Staff log channel”, the “Deletion delay”, the “Default user limit”, “Max rooms / member”, “Max rooms / server”, the “Max room duration” and “When the owner leaves”.
  4. Pick the options: “Create a linked text channel by default”, “Send the owner panel”, “Text access limited to members in voice”.
  5. In “Add a hub”, pick the “Hub channel” and the “Target category”.
  6. Set the “Voice name template” (and text name template) with the variables, e.g. {display_name} or {counter}, then the hub’s delay and limit.
  7. In “Commands /voice”, untick the subcommands you don’t want to give owners.
  8. Click 1 “Save Pulse Temp Channels”.
  9. Join the hub channel: the bot should create your channel and move you into it.

Key settings

Deletion delay
Time before an empty channel is deleted (0, 30 s, 1 min, 5 min — default —, 15 min, 1 h, or never with -1). Locked channels are never deleted automatically.
Max room duration
Only applied when the channel is empty: an occupied channel is never deleted.
When the owner leaves
“Keep absent owner”, “Transfer to oldest member”, “Allow /voice claim” or “Delete the room”.
Max rooms / member
1 channel per member by default: prevents channel spam.
Name variables
{username}, {display_name}, {user_id}, {tag}, {counter}, {counter_2}, {guild_name}, {hub_name}, {member_count}, {limit}, {random}, {date}, {time}.
Staff roles (IDs)
Roles (one ID per line) that keep access to a hub’s channels.

Tips

  • Put the target category where the bot has Manage Channels: without it, nothing is created.
  • You can set up several hubs (e.g. one per game), each with its own category and name template.

Frequently asked questions

I join the hub but nothing happens.

Check that the module and the hub (“Hub enabled”) are on, and that the bot has Manage Channels and Move Members in the target category. Also check that you haven’t reached “Max rooms / member”.

A member gets “command disabled” with /voice.

The subcommand is unticked in “Commands /voice” on the dashboard.

Empty channels don’t disappear.

Check the “Deletion delay” (-1 = never) and remember that a locked channel is never deleted automatically. /voice clean forces a cleanup.

Pulse Events Create, publish and track your server’s events with sign-ups (RSVP), reminders and recurrence. Community Premium: higher limits /event 9 steps

Free: 5 active events and 2 reminders per event. Premium: 50 active events and 5 reminders.

Permissions: Configuration: Manage Server or Administrator (always allowed); other roles can be given specific rights in “Permissions”. Bot, in the events channel: View Channel, Send Messages, Read Message History. Depending on the options: Manage Messages (pin, clean channel), Create Public Threads (auto thread) and Manage Roles (temporary role).

Commands

  • /eventModule panel: quickly “Create” an event, “View events”, “Dashboard” and “Help”. Requires Manage Server by default.

Step-by-step setup

  1. Enable the module with the switch 1.
  2. “Settings” tab: pick the “Events channel”, the “Log channel” and the “Timezone”, turn on the automatic options you want, then “Save settings”.
  3. “Create” tab: fill in “Event name”, “Description”, “Event type” (or “Start from a template”).
  4. Fill in “Date”, “Time” and “Duration (minutes)”.
  5. Pick “Location / Type” and “Location details”, the “Publication channel” and, if needed, the “Role to notify”.
  6. Set the “Capacity” and the “RSVP options” (simple or advanced), tick the “Automatic reminders” and choose a “Recurrence” if the event repeats.
  7. Click “Create as draft”.
  8. In “My events”, open the draft and click “Publish”: the message with the sign-up buttons is posted.
  9. During and after the event: “Start now”, “End”, “Reschedule…”, and check “Participants” (CSV, JSON, TXT export or Discord list).

Key settings

RSVP options
Simple: Going / Interested / Not going. Advanced: player, spectator, staff… Once capacity is reached, new sign-ups go on a waiting list.
Automatic reminders
24 h, 6 h, 1 h, 15 min before or at the start. The number is limited by your plan (2 on Free, 5 on Premium).
Recurrence
One-time event, every day, every week, every month or every weekend.
Automatic options
“Clean channel mode”, “Pin active events”, “Auto thread on publish”, “Archive completed threads”, “Auto temporary role”, “Remove role after the event”.
Permissions
Gives specific roles the right to create, edit, delete, manage participants, reminders, templates or recurrences, and export attendance. With no role ticked: admins only.

Tips

  • Tick “Also save as a template for later” to reuse an event format.
  • “Clean channel mode” deletes messages that aren’t events: keep it for a dedicated channel.

Frequently asked questions

I can’t create any more events.

You’ve reached the active events limit (5 on Free, 50 on Premium). End or archive old ones.

The temporary role isn’t given.

The bot needs Manage Roles and its role must be above the created role.

The times shown are off.

Check the “Timezone” in the module’s settings.

Pulse Giveaways Run classic, scheduled, multi-winner, message-based, invite-based or cross-server giveaways. Community Premium: higher limits /giveaways 9 steps

Free: 3 active giveaways. Premium: 50 active giveaways.

Permissions: Configuration: Manage Server or Administrator; other roles can be given rights in “Staff permissions”. Bot: View Channel, Send Messages and Embed Links in the publication channel.

Commands

  • /giveawaysPanel to create, list, publish, end, cancel or re-roll a giveaway from Discord. Requires Manage Server by default. Members enter with the “Participate” button.

Step-by-step setup

  1. Enable the module with the switch 1.
  2. “Settings” tab: pick the “Default channel” and the “Log channel”, set “DM winners”, “DM participants”, “Auto-remove members who leave”, then “Save settings”.
  3. “Create” tab: enter the “Giveaway name”, “Prize” and “Description”.
  4. Pick the “Type” (Classic, Cross-server, Messages, Invites, Tickets, Multi-winner, Recurring, Scheduled), the number of “Winners” and the “Duration”.
  5. For a scheduled giveaway, enter the “Launch date & time” (Europe/Paris timezone).
  6. In “Requirements”, set “Minimum messages” or “Minimum invites” if needed (0 = off).
  7. In “Tickets & bonuses”, set the “Base tickets” and add “Ticket bonuses by role” (e.g. Booster = +2).
  8. Click “Create draft”, then publish it from the “Giveaways” tab (“Publish” button).
  9. At the end: “End” draws winners immediately, “Re-roll” draws again, “Cancel” stops the giveaway.

Key settings

Type
Messages and Invites require a minimum > 0 (suggestions: 10 messages, 1 invite). Multi-winner requires at least 2 winners.
Presence mode (cross-server)
Presence required on all servers, on at least one partner server, or only on this server. Partner servers (Discord IDs) must accept the invitation.
Ticket prefix
Prefix for ticket numbers (e.g. GA-00001).
Auto-remove members who leave
Removes the entry of a member who leaves the server. Recommended.
Staff permissions
Rights you can delegate: create, edit, cancel, end, re-roll, view/export participants, manage requirements, cross-server and settings.

Tips

  • The “Invites” type relies on Pulse Invites tracking: enable that module so invites are counted.
  • Scheduled giveaways switch from “Scheduled” to “Active” at the chosen time; the duration starts at launch.

Frequently asked questions

I can’t publish a new giveaway.

You’ve reached the active giveaways limit (3 on Free, 50 on Premium). End or cancel one.

A member can’t enter.

They probably don’t meet the requirements (minimum messages or invites, presence on partner servers).

Pulse FAQ Build an interactive help center for your members: one question per block, a private answer on click and useful links. Community Free /faq 8 steps

Permissions: Configuration: Manage Server. Bot, in the FAQ channel: View Channel, Send Messages, Embed Links and Read Message History (to find and update its messages).

Commands

  • /faqModule panel with “Preview”, “Publish / Sync”, “Help” and “Dashboard”. Requires Manage Server.

Step-by-step setup

  1. Enable the module with the 1 “Enable Pulse FAQ” switch.
  2. In “General configuration”, pick the “FAQ channel” (ideally a dedicated channel that’s read-only for members).
  3. Fill in “Main title”, “Subtitle”, “Main description” and, if you have a support site, the “Support URL (optional)”.
  4. Pick the colors, the “Size mode” and the “Decorative band”.
  5. In “Questions / answers”, click “Add a question”: fill in “Emoji”, “Title”, “Button text”, “Short description (shown in the channel)” and “Full answer (shown as ephemeral)”.
  6. If needed, turn on the “Useful links” block and add your links (text, emoji, URL).
  7. Check the “Live Discord preview” and keep “Ephemeral answers” and “Auto-repost if deleted” ticked.
  8. Click 2 “Save”, then “🚀 Publish / Sync” to publish or update the FAQ in the channel.

Key settings

Ephemeral answers
Only the member who clicks sees the answer: the channel stays clean. Recommended.
Auto-repost if deleted
Automatically reposts a deleted FAQ message, in the right place.
Size mode
Compact (Discord sizes it on its own, no image), Standard or Large (decorative band, question image visible in Large only).
Test mode
Generates a preview without actually publishing on Discord.
Limits
Up to 40 questions and 15 useful links.

Tips

  • After every change, remember to click “Publish / Sync”: saving alone doesn’t necessarily update the channel.
  • Disable a question with its checkbox rather than deleting it if you want to reuse it later.

Frequently asked questions

The FAQ doesn’t appear in the channel.

Check that the module is enabled and “Test mode” is unticked, then click “Publish / Sync”. The bot must be able to view the channel, write in it and embed links.

My members see everyone’s answers.

Tick “Ephemeral answers”: the answer is then only visible to the person who clicks.

Support family

Support

Tickets, Pulse Quest forms and emoji locking.

Pulse Tickets A complete private ticket system: panel with a topic menu, channels created automatically per category, auto-close, verified reviews and transcripts. Support Premium: higher limits /ticket 11 steps

The whole module is free. Only the multicolor color mode for Tickets embeds is limited to Premium servers.

Permissions: Configuration: the server owner and members with Manage Server or Administrator (/ticket command and dashboard). Handling tickets: those same admins + the Support roles and Ticket admin roles. On the bot side: View Channels and Manage Channels on the server to create ticket categories and channels; in the panel channel: View Channel, Send Messages, Embed Links and Attach Files.

Commands

  • /ticketOpens the Pulse Tickets configuration panel in Discord (enable/disable, panel channel, reviews channel, logs channel, support roles, adding subjects, publishing the panel). Limited by default to members with Manage Server.

Step-by-step setup

  1. Enable the module with the switch on the Pulse Tickets card at the top of the dashboard (or the “Enable” button in /ticket). While it’s disabled, the settings stay hidden.
  2. Open Tickets → Configuration. In the “Automatic channels” tab (1), click “Create auto channels”: the bot creates or reuses the system channels ticket (panel), ticket-avis (verified reviews) and ticket-log (logs). If a “Bot permissions to check” banner appears, first give the bot’s role View Channels and Manage Channels.
  3. In the “Activation, channels and permissions” tab, check “Panels channel”, “Verified reviews channel” and “Ticket logs channel”, then pick the “Simultaneous tickets” rule (default: one open ticket per member across the whole server).
  4. Still in that tab, tick your Support roles (they see, answer and close tickets) and your Ticket admin roles. With no role ticked, only the server admins see the tickets.
  5. Set up the “Auto-close and alerts” tab: close if the member never wrote, warning before closing, staff alert with no reply, deletion of closed tickets, review reminder. Each delay has shortcuts (30 min, 1 h, 1 day…).
  6. Click “Save and publish the panel” (2) to save the configuration.
  7. Go to Tickets → Subjects: edit or add your subjects with “Add a subject” (25 max). For each one: Emoji, Name, Description, “Auto-response” (message sent when the ticket opens), and in “Subject settings” the “Discord auto category”, the “Channel prefix” and the “Review type”. Click “Save subjects” (1).
  8. Go to Tickets → Panels: customize “Panel title”, “Dropdown menu text”, “Ticket opened phrase”, “Ticket closed phrase” and “Panel description”. Check the result in the “Live Discord preview” tab.
  9. Pick the “Publication channel”, then click “Save and publish the panel” (2). The panel appears in Discord with its subject menu; “Publish a panel” publishes an extra one (all tickets stay centralized).
  10. Test end to end with a member account: pick a subject in the menu → a private channel is created in the subject’s category → staff replies → a staff member clicks “Close” → “Request review” or “Transcript” → the ticket is deleted after the chosen delay, with the transcript sent to the logs.
  11. Then look at Tickets → Transcripts (transcript library, readable and deletable from the dashboard) and Tickets → Logs (statistics, response times, reviews).

Key settings

Simultaneous tickets
“One open ticket per member across the whole server”, “… and per panel”, “… and per subject” or “No automatic limit”. Recommended: one per server to avoid spam.
Support roles
Roles allowed to view, manage, close and delete tickets. They’re the ones added to each ticket channel’s permissions.
Ticket admin roles
Roles with advanced management rights over tickets, on top of the support roles.
Close if the member never wrote
Automatically closes an empty ticket. Delay set by “Close when there is no first message” (e.g. 1 day), with “Warn before closing” (e.g. 1 h before).
Alert staff when there’s no reply
Pings the “Staff alert ping roles” if nobody replies after “Staff alert after” (e.g. 30 min), with “Staff reminder cooldown” and “Maximum staff reminders” (0 = unlimited, 3 by default).
Delete closed tickets after a delay
Deletes the channel after “Deletion after closing” (e.g. 1 day), with a transcript. Paused while a review is pending.
Time to leave a review
Time given to the member to rate the support (e.g. 7 days); “Review reminder before expiration” nudges them before the end.
Channel format
Name of the created channels, with variables: {subject}-{ticket_number} → support-15, {subject}-{ticket_number_padded} → support-00015, {subject}-{ticket_id_short} → support-tck-15.
Status emojis in channel names
Adds an emoji at the start of the channel name based on the status: open, waiting for staff, answered, closed or review pending.
Close if the member leaves the server
Automatically closes open tickets when their author leaves the server. Recommended: on.

Tips

  • Each subject creates or reuses its own Discord category (“Discord auto category”): use clear category names to keep your server tidy.
  • In the panel description, the variables {average_response_time}, {average_rating}, {open_tickets} or {support_online} show live statistics, updated automatically.
  • Only ticket staff can close, change the subject, add/remove a member or delete; the author can only reopen their ticket before it’s deleted.
  • No review can be requested after an automatic close unless “Request a review after auto-close” is on.

Frequently asked questions

The bot shows “Missing bot permissions” when a member opens a ticket.

The bot needs Manage Channels and View Channels on the server to create the ticket’s category and channel. Add these permissions to its role on Discord, then try again (or run “Create channels” again).

My panel won’t publish: “Missing permissions in #channel”.

In the panel channel, the bot needs View Channel, Send Messages, Embed Links and Attach Files (the panel banner is an image). Also check that it’s a text channel.

A member can’t open a second ticket.

That’s the “Simultaneous tickets” rule: the bot replies “You already have an open ticket”. Change the rule (per panel, per subject or no limit) if you want to allow several tickets.

Where can I find the conversation from a deleted ticket?

The transcript (.txt, up to the last 500 messages) is sent to the “Ticket logs channel” and kept in Tickets → Transcripts on the dashboard.

Pulse Quest Guided forms (applications, partnerships, requests) that members fill in with /quest and that staff review in an inbox channel. Support Premium: higher limits /quest 11 steps

1 form on the free plan, up to 25 forms with Premium. Multicolor color mode is Premium only.

Permissions: Configuration: dashboard, limited to members with Manage Server or Administrator. Handling answers (Approve, Reject, Pending, Export): server admins + Pulse Quest staff roles. On the bot side: it must be able to see the “Inbox channel” and send messages, embeds and files there (TXT/PDF transcripts).

Commands

  • /questOpens the menu of active forms for the member (or offers to resume a form in progress if progress is saved). Available to all members.

Step-by-step setup

  1. Open Quests → Configuration and, in the “Activation and inbox” tab (1), turn on “Enable Pulse Quest”.
  2. Pick the “Default inbox channel”: that’s where every answer submitted by a member is sent, with its TXT and PDF transcript. Use a private staff-only channel.
  3. In “Pulse Quest staff roles”, turn on the roles that should handle incoming submissions.
  4. Decide whether you want “Allow multiple answers per member” and “Save progress” (recommended: on, so the member can resume later).
  5. Click “Save Pulse Quest” (2).
  6. Go to Quests → Forms. Fill in the first form: Emoji, Name, “Estimated time”, “Inbox channel” (otherwise the default channel), and the Description.
  7. If the form should be restricted, turn on “Limit to a role” and pick the “Required role”. Keep “Active in /quest” on so it shows up in the menu.
  8. Add your questions with “Add a question” (25 max): pick the Type (Short answer, Long answer, Single choice, Multiple choice, Rating, Number, Date, Link), the Question text, “Required”, and for choices the Options separated by ; (e.g. Oui; Non). Min/Max limit the answer length.
  9. Click “Save forms” (1). A form with no questions doesn’t appear in /quest.
  10. Test with a member account: /quest → pick the form → “Start” → answer → “Summary” → submit. The submission arrives in the inbox channel with the staff buttons “Approve”, “Reject”, “Pending” and “Export”.
  11. Find all submissions in Quests → Answers and their transcripts in Quests → Transcripts.

Key settings

Enable Pulse Quest
Enables the /quest command on the server.
Default inbox channel
Channel where submitted answers arrive (TXT + PDF). Each form can have its own “Inbox channel”.
Pulse Quest staff roles
Roles that can handle answers (approve, reject, put on hold, export).
Allow multiple answers per member
Off = a member can only answer once. Turn it on for recurring forms.
Save progress
The member can leave and “Resume” later. Recommended: on for long forms.
Limit to a role / Required role
Restricts the form to one role (server admins always have access).
Type (question)
Short answer, Long answer, Single choice, Multiple choice, Rating (1 to 5), Number, Date or Link (must start with http:// or https://).

Tips

  • On the free plan you only get one form (counter 1/1): group your questions together or go Premium to separate applications, partnerships, etc.
  • Use a private inbox channel: submissions contain members’ full answers.
  • The “Automatic exports” block shows the number of approved and pending submissions and of active forms: handy for tracking volume.

Frequently asked questions

/quest doesn’t show any form.

Check that “Enable Pulse Quest” is on, that the form has at least one question, that “Active in /quest” is ticked, and that the member has the “Required role” if “Limit to a role” is on.

I can’t add a second form.

The free plan is limited to 1 form. The server’s Premium unlocks up to 25 forms.

A staff member can’t approve a submission.

They need Manage Server, Administrator or one of the “Pulse Quest staff roles”. Add their role in the configuration, then save.

Pulse Emoji Lock Restrict your custom emojis to certain roles using Discord’s native restrictions, without deleting any message. Support Free /emojis 8 steps

Permissions: Configuration: members with Manage Server (/emojis command and dashboard). On the bot side: Manage Expressions (emojis) to change emoji restrictions.

Commands

  • /emojisShows Pulse Emoji Lock’s status with the “Sync”, “Apply lock”, “Make public”, “Status”, “Help” and “Open dashboard” buttons. Limited by default to members with Manage Server.

Step-by-step setup

  1. Enable the module with the switch on the Pulse Emoji Lock card at the top of the dashboard.
  2. Check that the bot’s role has the Manage Expressions permission: the “Discord application” tab shows “Permission OK” when it’s fine.
  3. Run /emojis, then “Sync” if the “Detected emojis” list is empty (it’s also checked automatically).
  4. In the “Emoji access rule” tab (1), pick the behavior: “Custom selection”, “Lock everything” or “Leave everything public”.
  5. In the “Allowed roles” tab, turn on at least one role: only these roles will be able to use locked emojis.
  6. In “Custom selection” mode, tick the emojis to restrict in the “Detected emojis” section.
  7. Click “Save Pulse Emoji Lock” (2): the restriction is applied on Discord. You can also use “Apply lock” in /emojis.
  8. Check the result in the “Discord application” tab (Mode, Restricted emojis, Last application, Last result).

Key settings

Custom selection
Only the emojis ticked in “Detected emojis” are restricted to the allowed roles.
Lock everything
All the server’s custom emojis are restricted to the allowed roles (ideal for “VIP” or booster emojis).
Leave everything public
No emoji is locked. Useful for removing the module’s restrictions.
Automatically release unticked emojis
Makes public the emojis that were managed by Pulse Emoji Lock but are no longer targeted. Recommended: on.
Allowed roles
Discord roles allowed to use the restricted emojis. Required as soon as an emoji is locked.

Tips

  • No message is deleted: Discord simply shows locked emojis as unavailable to members without an allowed role.
  • To unlock everything cleanly, pick “Leave everything public” or click “Make public” in /emojis.
  • After adding new emojis to the server, click “Sync” so they show up in the list.

Frequently asked questions

“Missing bot permission: Manage Expressions / emojis”.

Give the bot’s role the Manage Expressions permission in the server settings, then click “Apply lock”.

“Choose at least one allowed role before applying the lock”.

A lock with no role would make the emojis unusable for everyone: turn on at least one role in the “Allowed roles” tab, then save.

“No emoji selected to lock”.

You’re in “Custom selection” mode with no emoji ticked. Tick emojis in “Detected emojis” or switch to “Lock everything”.

Ads family

Ads and bumps

Submitting, moderating and broadcasting your community’s ads, plus the /bumps announcement.

Ad settings The heart of PROMO PULSE: submission, moderation, publication and BUMP channels, staff roles, quotas and the BUMP delay. Ads and bumps Premium: higher limits /setup 10 steps

Everything is free, except the multicolor color mode for embeds and the “Custom footer (Premium)”.

Permissions: Configuration: members with Manage Server (/setup and dashboard). The “Set everything up (1 click)” button requires Manage Channels, Manage Server or Administrator. On the bot side: Manage Channels to create the channels automatically, then view/send/embed links in each configured channel.

How does it work?

An ad goes through 4 steps. Once the channels are set up, the bot handles everything.

  1. Submit: A member clicks “Submit an ad” in the submission channel and fills in the form.
  2. Review by your staff: The ad lands in your server’s moderation queue. Your staff accepts or rejects it.
  3. Publication: Once accepted, the ad is posted automatically in the accepted ads channel, with a 🔄 Bump button.
  4. Bump = broadcast: Each bump sends the ad to the Bumps channel of every PromoPulse server and pushes it up on the website. It can be repeated after the BUMP delay.

Why 4 required channels? PromoPulse is an exchange network: for your server’s ads to be shown elsewhere, your Bumps channel receives in return the ads bumped by other servers. The accepted ads and Bumps channels must therefore stay visible to @everyone, and the moderation queue reserved for staff.

Commands

  • /setupOpens the configuration panel in Discord; the “Ad settings” panel offers “Set everything up (1 click)”, the “Setting to change…” menu and the “Advanced settings (optional)…” menu. Limited by default to members with Manage Server.

Step-by-step setup

  1. Type /setup in Discord and open the “Ad settings” panel.
  2. The quickest way: click “Set everything up (1 click)” (1). The bot creates or reuses the category and the channels of the “Preconfigured channels” block (1 top image), sets the permissions and fills in the configuration. Roles with the Administrator permission automatically become staff.
  3. To choose your own channels, use “Setting to change…” (2) instead: Ad channel, Moderation channel, Instructions channel, BUMP channel and Server language. Each choice is saved automatically.
  4. If needed, complete it through “Advanced settings (optional)…” (3): Logs channel, Warning channel, Staff roles, Booster role, BUMP cooldown, Quotas per role, Custom footer.
  5. On the dashboard, enable the Ad settings card if it isn’t already, then open the page: in the “Ad channels” tab (1), check Ad submission, Accepted ads, Bumps, Moderation queue and Alerts and reports (the “channels ready” counter must be complete).
  6. “Allowed roles” tab: pick the “Booster role” and turn on the “Staff roles” that moderate ads.
  7. “Ad settings” tab: set the “BUMP delay” in minutes (10 minimum).
  8. “Ad quotas” tab: “Add a quota” → role ID + Ads/day to give certain roles more posts.
  9. Check the result in “Live Discord preview”, then click “Save ad settings” (2).
  10. Test: in the submission channel, a member clicks “Submit an ad”, picks the category and fills in the form; the ad lands in the moderation queue with “✅ Accept” / “❌ Reject”.

Key settings

Ad submission
Instructions channel: members start creating their ad there (guide message with the “Submit an ad” button).
Accepted ads
Ad channel: approved ads are published there.
Moderation queue
Moderation channel, private to staff: pending ads are accepted or rejected there. Required, otherwise no ad can be submitted.
Bumps
BUMP channel dedicated to cross-server bumps.
Alerts and reports
Warning channel: reports, warnings and sensitive notifications.
Booster role
Members with this role get 3 ads/day by default instead of 1.
Staff roles
Roles allowed to moderate ads.
BUMP delay
Minimum time before a member can bump again (10 min minimum, 10,080 max). 10 min by default.
Ad quotas
Number of ads per day for a role (0 to 100). A member gets the highest quota among their roles; otherwise 1 ad/day.

Tips

  • The “Set everything up (1 click)” button can be run again safely: it reuses existing channels instead of creating duplicates.
  • Keep the moderation channel hidden from members: it contains unchecked ads.
  • Quotas don’t add up: the highest limit among the member’s roles applies.
  • An inactive ad (no bump or edit) or one whose author leaves the server is deleted automatically, along with its bumps, after 30 days at most.

Frequently asked questions

The “Set everything up (1 click)” button refuses the action.

You need Manage Channels, Manage Server or Administrator. The bot itself needs Manage Channels to create the category and channels.

Members can’t submit an ad.

Check that the module is enabled and that the “Moderation queue” is configured and accessible to the bot: without a valid moderation channel, submission is blocked.

“Ad quota reached for today”.

The member has reached their daily limit (1 by default, 3 with the booster role). Raise it through “Ad quotas” for a given role.

Ads The list of all the ads linked to your server, with their status, bumps and votes. Ads and bumps Free /stats 7 steps

Permissions: Viewing and deleting from the dashboard: access to the server’s dashboard (Manage Server). The /stats, “Create an ad” and “Report” commands are open to all members.

Commands

  • /statsShows the member their ad quota (and why), how many they’ve posted today, the BUMP cooldown and whether they can bump now.
  • Create an ad (right-click)Apps menu on a message: starts the ad creation form (quota and moderation channel are checked).
  • Report (right-click)Apps menu on an ad or a bump: reports the message to the PROMO PULSE developers.

Step-by-step setup

  1. Make sure the Ad settings are configured (submission, moderation and publication channels).
  2. Members create their ad with the “Submit an ad” button in the submission channel, or by right-clicking a message → Apps → “Create an ad”.
  3. They pick the ad type in the menu, then fill in “Title”, “Description” (100 characters minimum, no links), “Link” and the optional image.
  4. Open Ads on the dashboard to see all the guild’s ads and their status (pending, accepted, rejected, hidden…).
  5. Click “Links” to check where an ad points.
  6. To remove an accepted ad, click “Delete” in the Action column and confirm.
  7. Encourage your members to use /stats to see their remaining quota and their BUMP cooldown.

Key settings

Status
The ad’s state: awaiting moderation, accepted (public), rejected, hidden…
Bumps
Number of times the ad has been bumped.
Votes
Up / down votes received by the ad.
Action
“Delete” button, only available for accepted ads.

Tips

  • The right-click “Report” doesn’t alert your staff: it sends the report to the PROMO PULSE developers. For your own server, use the “Alerts and reports” channel.
  • A member can only request one edit of their ad per day; edits go through moderation.

Frequently asked questions

How does a member know their quota?

With /stats: they see their daily quota (1 ad/day by default, booster role or role quota), how many they’ve posted today and their BUMP cooldown.

Why did an ad disappear on its own?

An ad with no bump or edit for 30 days, or whose author left the server, is deleted automatically along with its bumps.

Why can’t I delete a pending ad from this table?

The Action column only covers accepted ads. Pending ads are handled in Ad moderation (Accept, Reject, Delete everywhere).

Ad moderation The ad review queue: accept, reject or delete ads and approve edit requests. Ads and bumps Free 8 steps

Permissions: Moderation on Discord: the Staff roles set in Ad settings (and admins), using the moderation queue buttons. On the dashboard: access to the server’s dashboard (Manage Server). The bot must be able to view and write in the “Moderation queue” channel.

Step-by-step setup

  1. First set up the “Moderation queue” and the “Staff roles” in Ad settings.
  2. When a member submits an ad, it lands in the Discord moderation channel with the “✅ Accept” and “❌ Reject” buttons (a “Reason” is asked for on rejection).
  3. On the dashboard, open Ad moderation: the “Review queue” lists pending ads.
  4. Click “Check link” to check the destination before deciding.
  5. Click “Accept” to publish the ad in the accepted ads channel, or “Reject” to turn it down.
  6. “Delete everywhere” permanently removes the ad (public message and bumps included).
  7. In “Edits to review”, handle members’ edit requests: “Accept edit”, “Reject” or “Delete”.
  8. The “Accepted ads” list and “Latest moderation actions” help you keep the history under control.

Key settings

Review queue
Ads waiting for a staff decision.
Edits to review
Edit requests sent by authors of accepted ads (one per day at most).
Accepted ads
Public ads, which you can still reject or delete everywhere.

Tips

  • Always check the link with “Check link”: it’s the best protection against misleading links.
  • Give a clear reason when rejecting: the author understands what to fix before resubmitting.

Frequently asked questions

Ads don’t arrive in the moderation channel.

Check that the “Moderation queue” is set in Ad settings and that the bot can view the channel and send messages there. Without a valid moderation channel, submission is blocked.

A moderator can’t get the Accept/Reject buttons to work.

Their role must be one of the “Staff roles” in Ad settings (or they must be an administrator).

BUMP announcement A pinned announcement that explains to your members how to support the server (bump, ads, statistics). Ads and bumps Free /bumps 8 steps

Permissions: Configuration: Administrator only (/bumps) or the dashboard. On the bot side, in the announcement channel: View Channel, Send Messages, Embed Links, Read Message History and Manage Messages (needed to pin and clean up old announcements).

Commands

  • /bumpsOpens the BUMP announcement configuration panel (channel, color, title, description, mention, footer, image, platforms) and posts or refreshes the message. Administrators only.

Step-by-step setup

  1. Open Bumps on the dashboard (or type /bumps in Discord).
  2. Pick the “Announcement channel” (text or announcement channel) and the “Color”.
  3. Set the “Purge depth” (number of recent messages checked to remove the old announcement, e.g. 1000) and keep “Pin automatically” on.
  4. Write the announcement’s “Title” and “Description”.
  5. Pick the “Mention”: a server role, @here, @everyone or a custom mention.
  6. Fill in the “Footer” and, if you like, an “Image or banner” (https URL).
  7. In “Platforms”, click “Add” for each block to show: Name, optional URL and Commands in the format commande = explication (24 platforms max).
  8. Check the “Live Discord preview”, then click “Save and publish” (1): the announcement is posted (or refreshed) in the channel and pinned.

Key settings

Announcement channel
Channel where the BUMP announcement is posted on Discord.
Purge depth
Number of recent messages the bot can clean up before reposting the announcement, so only one remains.
Pin automatically
Pins the announcement after posting (and cleans up the “pinned a message” system messages). Requires Manage Messages.
Mention
Mention sent with the announcement: role, @here, @everyone or custom text.
Platforms
Command blocks shown in the announcement, each with a name, an optional link and a list of commands.

Tips

  • Don’t confuse the /bumps announcement (explanation message for your server) with the “BUMP delay” in Ad settings (cooldown between two bumps of an ad).
  • Each save reposts the message and deletes the old one: no need to clean it up by hand.

Frequently asked questions

“Only administrators can use this command”.

/bumps is limited to members with the Administrator permission. Use the dashboard or ask an administrator.

The announcement isn’t pinned or old ones aren’t deleted.

The bot needs Manage Messages and Read Message History in the announcement channel. Without these rights, it posts but can’t pin or clean up.

“Invalid channel”.

Pick a text channel or an announcement channel: voice channels and forums aren’t accepted.

Security family

Security

Captcha, AutoMod, anti-scam, anti-raid, moderation, channel rules, logs and backups.

Security: overview Captcha, AutoMod, anti-scam, anti-raid, moderation, logs and restore: everything that protects your server, in a single family. Security Premium: higher limits /setup 6 steps

The family is free. Two features require Premium: the automatic anti-scam scan (scheduled) and Pulse Restore (analysis and restore).

Permissions: You need the Discord permission Manage Server (or Administrator) to open /setup and the dashboard. Each module then asks the bot for its own permissions, listed in its guide.

Commands

  • /setupOpens the setup overview. Pick the “Security” family to see each module’s status.
  • /dashboardGives the link to the web dashboard, where every module is configured in detail.

Step-by-step setup

  1. Type /setup on your server, then open the Security family (🛡️).
  2. Read the list: each module is marked Enabled, To configure, Available, Premium required or See the dashboard.
  3. Use the 1 “Choose a module…” menu to show a module’s page: its status, its family and how to configure it (slash command or dashboard).
  4. To turn several modules on or off at once, tick or untick them in menu 2. Leaving it untouched changes nothing.
  5. Click 3 “Dashboard” to configure the options in detail on the website.
  6. Finish with “End”, or go back to the overview with “Overview”.

Key settings

⚡ configurable here
The module can be turned on or off directly from menu 2 in /setup, without going through the website.
Premium required
The module needs an active Premium subscription on this server (this is the case for Pulse Restore).

Tips

  • Recommended order for a new server: Pulse Captcha → Anti-Raid (in simulation mode first) → Anti-scam → AutoMod → Server logs.
  • Almost every module acts on roles and channels: place the bot’s role above the roles it must manage (Server Settings → Roles).
  • Turning a module on in /setup isn’t always enough: channels and roles are then chosen in its command or on the dashboard.

Frequently asked questions

A module shows “To configure”, why?

It’s enabled, but a required setting is missing (a channel, a role…). Open its page with menu 1 to see where to complete it.

I don’t see the Security family in /setup.

Check that you have the Manage Server permission. Without it, Discord hides the command or the bot refuses the configuration.

Pulse Captcha Newcomers go through a verification before accessing the server. Raid bots and automated accounts stay blocked. Security Free /captcha 10 steps

Permissions: Command limited to members with Manage Server (or Administrator). The bot needs Manage Roles (give and remove roles), Manage Channels (create the Captcha channel and write permissions), View Channels, Send Messages, and Manage Messages if you turn on “Block messages outside Captcha”. If the expiration action is Kick or Ban, add Kick Members or Ban Members. The bot’s role must be above the “Verified” and “Unverified” roles.

Commands

  • /captchaOpens the admin panel: status, mode, channel, roles, statistics, and the “Auto setup”, “Enable / Disable”, “Repair permissions”, “Publish panel”, “Test” and “Dashboard” buttons.

Step-by-step setup

  1. Enable Pulse Captcha from its card at the top of the dashboard (or through /setup). Its settings stay hidden while it’s disabled.
  2. In the 1 “Captcha setup” tab, keep Create roles, Create channel and Save permissions on: the bot creates “🚧 Non vérifié”, “✅ Vérifié” and the “🛡️┊captcha” channel if they don’t exist.
  3. Pick the Captcha mode (“Web validation” by default), then check or pick the Unverified role, the Verified role, the Captcha channel and the Captcha logs channel (a private staff channel, not a public one).
  4. “Protected channels” tab: keep Protect all channels on (recommended setup). The Unverified role then loses access to every channel except the Captcha channel.
  5. If needed, tick the Read-only visible channels (for example #rules or #announcements): newcomers can see them but can’t write in them.
  6. “Challenge and expiration” tab: set Max attempts (3), Session expiration (15 min) and Expiration action (“None” to start with). In “Custom question” mode, fill in the question and the answer.
  7. Click 2 “Save Pulse Captcha”.
  8. On Discord, type /captcha, then click Auto setup: the bot finalizes roles, channel and permissions and publishes the panel. If you changed channels, use Publish panel.
  9. In Server Settings → Roles, drag the bot’s role above “✅ Vérifié” and “🚧 Non vérifié”.
  10. Test with an alt account: it should only see the Captcha channel, click “Start verification”, pass, then see the rest of the server. You can also click Test in /captcha.

Key settings

Captcha mode
Verification method: “Web validation” (the member logs in with Discord on the website), “Images” (copy a code), “Quick math”, “Emoji choice”, “Custom question” or “Simple button”. Web validation or Images filter bots best. “Simple button” is the weakest.
Unverified role
Role given automatically to each newcomer and removed once verification succeeds. It’s the one that carries the channel restrictions.
Verified role
Role added after success. The Captcha channel is hidden from it, so verified members no longer see it.
Protect all channels
Locks every channel for the Unverified role until the member is verified. Keep it on, unless you want to pick channels one by one in “Channels to lock with targeted protection”.
Block messages outside Captcha
Deletes messages an unverified member sends outside the Captcha channel (a safety net if a permission is misconfigured).
Protect new channels
Automatically applies the Captcha lock to channels you create later. Keep it on.
Max attempts
From 1 to 10. Beyond that, the session fails and the member must restart verification. 3 is a good balance.
Session expiration
Time allowed to pass, from 5 to 1440 minutes. 15 by default.
Expiration action
“None”, “Kick” or “Ban” when the session expires. Start with “None”. Switch to “Kick” if you get a lot of bot accounts.
Code length
Number of characters in the code in “Images” mode (4 to 8, 5 by default).
Custom question / Custom answer
Used in “Custom question” mode. The answer is stored hashed: the field stays empty after saving, that’s normal.

Tips

  • Only members who join after activation get the Unverified role. Your current members keep their access.
  • If another bot gives newcomers a role (autorole), that role can reopen channels. On Discord, a permission granted to a role overrides the Unverified role’s denial. Give that role after verification instead.
  • After a big channel reorganization, click Repair permissions in /captcha to reapply the lock everywhere.
  • Never make the Captcha logs channel public: it shows newcomers’ usernames and failures.

Frequently asked questions

The member passed, but still can’t see anything.

Discord refused to give them the role. The bot says so in its reply. Place the bot’s role above the Verified role, check that it has Manage Roles, then try again.

Newcomers can still see some channels.

Either “Protect all channels” is off and the channel isn’t ticked in the targeted list, or another of the member’s roles allows viewing the channel. Run Repair permissions in /captcha and check the roles given on join.

How does “Web validation” work?

The member clicks “Open web verification”. A secure page on the website opens, tied to their session, and they log in with Discord to validate their account. The link is personal and expires with the session.

The verification panel disappeared from the Captcha channel.

Type /captcha, then click Publish panel: the bot reposts it in the configured channel.

AutoMod Drives Discord’s native AutoMod: insults, adult content, mention spam and spam are blocked before they’re even posted. Security Free /automod 8 steps

Permissions: Command limited to members with Manage Server (or Administrator). Discord AutoMod rules are created in the bot’s name: it needs Manage Server. For alerts, it must be able to View Channel and Send Messages in the alerts channel.

Commands

  • /automodDiscord panel to turn rules on or off, pick the alerts channel, the mention limit, the block message, the exempt channels and roles, and manage word lists.

Step-by-step setup

  1. Enable AutoMod from its card at the top of the dashboard (or through /setup).
  2. Turn on the useful rules: Discord presets, French insults, Adult content, Anti-mentions, Anti-spam and Profiles.
  3. Pick the AutoMod alerts channel: a staff channel where Discord reports every blocked message.
  4. Set the Mention limit (8 by default, between 2 and 50).
  5. If you like, customize the Block message (150 characters max). Leave it empty to keep Discord’s default message.
  6. Add the AutoMod exempt channels and AutoMod exempt roles (your staff, for example). Hold Ctrl to select several.
  7. Complete the Filtered profanity words and Filtered adult words lists (one word per line) with your community’s own vocabulary.
  8. Click 1 “Save AutoMod”, then check in Server Settings → AutoMod that the rules have appeared.

Key settings

Discord presets
Turns on the word lists Discord recommends for risky content.
French insults
Blocks insults and aggressive words (French list), plus your “Filtered profanity words” list.
Adult content
Blocks sexual terms, plus your “Filtered adult words” list.
Anti-mentions
Blocks messages that go over the Mention limit. Essential against ping raids.
Anti-spam
Cuts down repeated messages or messages sent too fast (Discord’s spam filter).
Profiles
Watches suspicious usernames and profiles based on the rules Discord offers.
AutoMod exempt channels / roles
These channels and roles are exempt from the rules. Exempt your staff and the channels where some words are legitimate.

Tips

  • Messages are blocked by Discord itself, even when the bot is offline: it’s the most reliable protection against mass spam.
  • Discord limits the number of rules and keywords per server. Keep your lists short and targeted rather than pasting hundreds of words.
  • Exempt staff roles, otherwise your moderators will be blocked when quoting a message they need to sanction.

Frequently asked questions

I saved, but no rule shows up in the Discord settings.

The bot probably doesn’t have the Manage Server permission. Give it that permission, then save again.

A legitimate word is blocked.

Remove it from your “Filtered words” list, or exempt the channel concerned. If the block comes from the Discord preset, turn off “Discord presets” or exempt that channel.

I don’t receive any alerts.

Pick an AutoMod alerts channel and check that the bot can view that channel and write in it.

Anti-scam Detects and deletes phishing links, fake Nitro and crypto scams (text, images, QR codes) using a database of hundreds of thousands of dangerous links. Security Premium: higher limits /scam 9 steps

All real-time protection and manual scans are free. Only the scheduled automatic scan (“Automatic scan enabled”, “Schedule auto”) requires Premium.

Permissions: /scam is limited to members with Manage Server (or Administrator). The bot needs View Channels and Read Message History (analysis and scans), Manage Messages (deletion), Timeout Members (timeout), Kick Members or Ban Members depending on the chosen sanction, and Manage Server for the “Anti-scam AutoMod rules”.

Commands

  • /scamAnti-scam panel: Enable / Disable, “Quick scan”, “Full scan”, “Auto scan” (Premium), “Allowed links”, “Blocked links”, “Sync AutoMod” and “Web sources”.
  • /reportscam link [reason] [message_id]Reports a suspicious link or domain to the bot’s developers so it gets added to the database. reason adds context, message_id points to the message concerned. Open to all members.
  • Right-click a message → Apps → Report scamSame report as /reportscam, straight from a suspicious message.

Step-by-step setup

  1. Enable Anti-scam from its card at the top of the dashboard (or /scam → “Enable”).
  2. In the 1 “Anti-scam protection” tab, keep Scan links, Scan images, Scan QR codes and Delete scam messages on.
  3. Pick an Anti-scam alerts channel (staff channel) and keep Staff logs on to be told about every detection.
  4. Pick the Automatic sanction: “Timeout” is a good start. Set the Timeout duration (minutes) (60 by default). Turn on Timeout for scams and Timeout for crypto images if you want to sanction the authors.
  5. Turn on Anti-scam AutoMod rules so Discord blocks the best-known links upstream, and Use AI to analyze unknown content.
  6. Add your trusted domains in Allowed domains (one per line, for example your server’s website) and, if needed, accounts in Allowed authors.
  7. Click 2 “Save anti-scam”.
  8. Run a first Quick scan from the “Manual scan” section (or /scam) to clean up recent history, then follow the result in “Scan reports”.
  9. Premium: turn on Automatic scan enabled, pick the Auto frequency, the Time, the Scan mode and the Scan reports channel, then save.

Key settings

Block suspicious bots
Blocks bots that show scam signals.
Delete scam messages
Automatically deletes messages containing a blocked link. Keep it on.
Auto-learning
The system expands its lists based on confirmed detections.
Use AI
Turns on Pulse Antiscam AI: text and image analysis, OCR, image fingerprints. The AI is only called if the content is unknown to the database.
Silent sanction
Applies the sanction without warning the member by direct message.
Strict mode
Blocks risky links and profiles faster, with more possible false positives. Best kept for heavily targeted servers.
Automatic sanction
“None”, “Timeout”, “Kick”, “Ban” or “Quarantine”, applied according to the risk level.
Quick scan / Full scan
Number of messages analyzed: 10 to 100 for a quick scan (50 by default), up to 500,000 for a full scan (0 = the bot decides).
Blocked domains / Blocked patterns
Domains or expressions always blocked on your server, one per line.
Allowed domains / Allowed patterns
Links that are never blocked, one per line. Useful for your own websites or partners.

Tips

  • Administrators and members with Manage Server aren’t timed out by the anti-scam. Test with a regular account.
  • A genuine link blocked by mistake? Add its domain to Allowed domains rather than turning off the protection.
  • Encourage your members to use Report scam (right-click): every confirmed report also protects all other servers.

Frequently asked questions

A scam link got through without being deleted.

Check that the bot has Manage Messages in that channel and that the author isn’t in “Allowed authors”. Then report the link with /reportscam to add it to the database.

The automatic scan is grayed out.

Scheduling is limited to Premium servers. Manual scans remain free from Discord and the dashboard.

The full scan finds nothing in some channels.

The bot can only analyze channels it can see, with Read Message History. Give it access to the channels you want checked.

Anti-Raid Calculates a real-time threat score (mass joins, flood, mentions, links, bots) and reacts automatically: alert, timeout, quarantine or lockdown. Security Free /antiraid 9 steps

Permissions: Command limited to members with Manage Server (or Administrator). Depending on the actions enabled, the bot needs Manage Messages (delete spam), Timeout Members (timeout), Manage Roles (quarantine), Kick Members (kicking bots), Ban Members (softban), Manage Channels (lockdown slowmode) and View Audit Log. The bot’s role must be above the quarantine role.

Commands

  • /antiraidDiscord panel: Enable / Disable, “Simulation ON/OFF”, protection mode, “Thresholds”, “Actions”, “Whitelist”, “Logs”, “Quarantine”, “Lockdown” / “Unlock”, “Messages” and “Reset”.

Step-by-step setup

  1. Enable Anti-Raid from its card at the top of the dashboard (or /antiraid → “Enable”).
  2. In the 1 “Anti-Raid settings” tab, first turn on Simulation mode: the bot detects and logs, without deleting, sanctioning or locking anything.
  3. Pick the Protection mode (“Standard” suits most servers), the Anti-Raid logs channel and the Alerted roles (your staff).
  4. If you want quarantine, create a role with no channel access, pick it as the Quarantine role and place the bot’s role above it.
  5. “Detection thresholds” tab: keep the default values at first (for example 8 Joins in 30 s, Recent account = 24 h).
  6. “Automatic actions” tab: pick the reactions (Alert staff, Delete spam, Timeout spam, Lockdown on raid…).
  7. “Whitelist and messages” tab: add your staff roles to Whitelisted roles, trusted bots to Allowed bots (IDs) and the channels to ignore.
  8. Click 2 “Save Anti-Raid”.
  9. After a few days in simulation, read the logs. If no false alerts show up, turn off Simulation mode and save.

Key settings

Protection mode
“Light”, “Standard”, “Strict” or “Emergency”: level applied to the thresholds and recommended actions. Only switch to “Emergency” during an attack.
Simulation mode
Tests detections without any real action. Ideal for tuning thresholds.
Automatic lockdown
Allows a lockdown when the threat score goes over the threshold. With “Lockdown slowmode”, slowmode is applied to text channels, then the previous setting is restored at the end.
Lockdown duration
Default lockdown duration, from 1 to 1440 minutes (30 by default).
Joins / Join window
Number of joins within the time window that triggers an alert (8 in 30 s by default).
Messages / Message window / Identical messages
Flood thresholds: 6 messages in 4 s, or 4 identical messages by default.
Alert score / Raid score / Emergency score
Threat score tiers (45 / 75 / 105 by default): staff alert, likely raid, heavy attack.
Softban duplicates
Softban (ban then unban, to wipe messages) of identical-spam authors when the threshold is reached.
Quarantine recent accounts
Gives the Quarantine role to accounts younger than “Recent account” during suspicious activity.

Tips

  • Always stay a few days in Simulation mode before turning on real actions: you’ll see whether your thresholds trigger false alerts.
  • During an event (giveaway, partnership), lots of people join at once: temporarily raise Joins or switch to “Light”.
  • Pair Anti-Raid with Pulse Captcha: the Captcha stops bots at the door, Anti-Raid handles any that still get through.

Frequently asked questions

How do I lift a lockdown early?

Type /antiraid, then click Unlock. Each channel’s previous slowmode is restored.

The bot doesn’t apply any sanction.

Check that Simulation mode is off, that the action you want is ticked in “Automatic actions” and that the bot has the matching permission, with a role above the target.

My music bot got kicked.

Add its ID to Allowed bots (“Whitelist and messages” tab) or turn off “Kick suspicious bots”.

Pulse Moderation Warns, mutes, timeouts, kicks and bans with a per-member record, predefined reasons, automatic escalation and sanction sharing between servers. Security Premium: higher limits /warn membre 9 steps

All moderation is free. Only the Custom footer on sanction messages requires Premium.

Permissions: No setup command: everything is configured on the dashboard. Commands can be used by the owner, members with Administrator or Manage Server, and the roles or members added in the Moderators tab (with rights action by action). The bot needs Timeout Members, Kick Members, Ban Members, Manage Roles (mute role and warn roles), Manage Channels (creating the mute role) and Manage Messages. Its role must be above the members to sanction.

Commands

  • /warn membreWarns a member. Opens a form (reason, proof…).
  • /mute membre · /unmute membreMutes a member (mute role or timeout depending on the “Mute mode”), or removes the mute.
  • /timeout membreDiscord timeout with duration and reason in a form.
  • /kick membre · /ban membre · /softban membreKicks, bans (optional duration) or softbans (ban then unban to wipe recent messages).
  • /unban utilisateurUnbans a user from their Discord ID.
  • /unwarn membreRemoves a warning using its case number.
  • /mod-note membreAdds a private staff note to the member’s record.
  • /infractions membreShows a member’s full record (sanctions and notes).
  • /sanctionsLists the server’s recent sanctions.
  • /modPulse Moderation hub: records, warns, mutes and staff tools.
  • /mod-link invite | list | accept | refuse | revokeManages cross-server links: invite guild_id sends a request, list lists the links, accept, refuse and revoke take a link_id.
  • Apps menus (right-click)On a member: Moderate (warn, kick, ban… hub), Record, Member info. On a message: Sanction (proof added automatically), Delete message (purges the author’s messages), Clear.

Step-by-step setup

  1. Turn on the 1 “Enable Pulse Moderation” switch. Without it, every command replies that the module is disabled.
  2. 2 “General” tab: pick the Sanctions channel (public announcement, no buttons) and the Staff logs channel (log with “View case” and “Revoke” buttons).
  3. Pick the Mute mode: “Discord timeout” (nothing to prepare) or “Mute role”. In that case, click Create mute role so the bot creates it and sets its permissions on every channel.
  4. Set Warn expiration (7, 30 or 90 days, or “Never”) and the protections: Protect the owner, Protect admins, Ignore bots, Reason required, Proof required.
  5. “Moderators” tab: add your staff roles (or specific members) and tick their rights one by one (View records, Timeout, Unban, Notes, Revoke…).
  6. “Reasons” tab: create predefined reasons per sanction type (for example warn → “Spam / flood”), or import them from your rules. They appear as autocomplete suggestions.
  7. “Warns” tab: turn on Enable warn roles to assign a role based on the number of warns, and configure Automatic escalation (for example 3 warns → kick).
  8. Click 3 “Save Pulse Moderation”.
  9. Test with /warn on an alt account, then check the record with /infractions and the “Activity” tab.

Key settings

Sanctions channel
Channel where each sanction is announced publicly, without buttons.
Staff logs channel
Private staff log, with the “View case” and “Revoke” buttons.
Mute mode
“Mute role” (Discord role managed by the bot, created with “Create mute role”) or “Discord timeout” (native feature, 28 days max).
Warn expiration
After this period, a warn is no longer active and no longer counts toward escalation. 30 days by default.
DM member / Notify the member
Tells the sanctioned member by direct message.
Reason required / Proof required
Makes the reason or proof mandatory in sanction forms. Recommended for large teams.
Protect the owner / Protect admins / Ignore bots
Prevents sanctioning these targets, even by mistake. Keep it on.
Enable interserver
“Interserver” tab: required to send or receive sanctions shared with linked servers, in “Manual validation”, “Automatic apply”, “Log only” or “Suggestion” mode.

Tips

  • A moderator who only has Ban Members on Discord can’t use the commands: add their role in the Moderators tab.
  • In the “Sanctions” tab, Import Discord bans brings existing bans into the Pulse records, without banning anyone again.
  • For /kick and /ban, the form lets you delete messages from 0 to 7 days back. This purge is also carried over to linked servers in interserver mode.

Frequently asked questions

“Pulse Moderation is disabled” shows up when I type /warn.

Turn on the “Enable Pulse Moderation” switch on the dashboard, then save.

The bot refuses to sanction a member.

The member’s highest role is above (or at the same level as) the bot’s or yours, or the target is protected (owner, admin, bot). Move the bot’s role up in the role list.

How do I link two servers?

Turn on “Enable interserver” on both servers. On the first one, type /mod-link invite guild_id:<ID du second> (or use “Invite a server” on the dashboard). On the second one, accept with /mod-link accept link_id:<ID> or the “Accept” button.

Pulse Channel Rules Create channels with controlled content (photos, videos, links, media, files or text only) and automatically delete messages that don’t fit. Security Free /channel-rules 8 steps

Permissions: Command limited to members with Manage Server (or Administrator). The bot needs View Channel, Manage Messages (deletion) and Send Messages (warning) in each protected channel, and Manage Channels for “Create missing channels”.

Commands

  • /channel-rulesConfigures photo, video, link and allowed-content channels from Discord.

Step-by-step setup

  1. Turn on Enable Pulse Channel Rules at the top of the section.
  2. In “General settings”, pick the Staff log channel, then keep Delete non-compliant messages and Warn with a temporary embed on.
  3. First turn on Test mode: the bot simulates deletions without erasing any message, so you can check your rules.
  4. In “Channel rules”, click Add a rule and pick the Content type (for example “Photos only”).
  5. Pick the Target channel, or leave “Create automatically” so the bot creates the channel.
  6. Fine-tune the rule: Text with media, Links with media, GIF, Stickers, Delete, Warn (embed). Open “Advanced options” for the max size, extensions, domains and ignored roles or members.
  7. Click 1 “Save”, then Create missing channels if you chose automatic creation.
  8. Click Test, post a non-compliant message, check the log, then turn off Test mode and save.

Key settings

Content type
“Photos only”, “Videos only”, “Links only”, “Media only”, “Files only” or “Text only”.
Text with media
Allows a caption with the photo or video. Without this option, only the file is accepted.
Test mode
Simulates deletions without deleting messages. Use it while setting things up.
Ignore bots
Bot messages are never filtered. Keep it on.
Antiscam integration
Links in protected channels also go through the anti-scam.
Also send a DM
Also tells the member by direct message when their message is deleted.
Warning display time (sec)
The warning embed deletes itself after this delay (30 s by default).

Tips

  • Add staff roles to “Ignored roles (IDs)” (Advanced options) so moderators can post announcements in a photo channel.
  • Each rule has its own Active switch: you can pause a rule without deleting it.

Frequently asked questions

Non-compliant messages aren’t deleted.

Check that Test mode is off, that the rule is Active and that the bot has Manage Messages in that channel.

“Create missing channels” does nothing.

The bot needs the Manage Channels permission. This button only creates channels for rules left on “Create automatically”.

Server logs (Pulse Guild Logs) Keep a record of every important action (members, moderation, messages, roles, channels, security…), with a searchable, filterable and exportable history. Security Free 8 steps

Permissions: Configured on the dashboard only, by members with Manage Server. The bot must be able to View Channel, Send Messages and Embed Links in the logs channel. Without View Audit Log, some action authors stay shown as “Unknown”.

Step-by-step setup

  1. Pulse Guild Logs is off by default: turn on Enable Pulse Guild Logs.
  2. Turn on Also send to a Discord channel and pick the Discord logs channel, a private staff-only channel.
  3. Pick the Discord send mode: “All enabled logs”, or “Critical / security / warning only” if your channel gets too noisy.
  4. Keep Keep history on the dashboard on and pick the Retention (7, 14, 30, 90, 180 or 365 days).
  5. In “Quick category toggles”, turn off the categories you don’t need. Open “Detailed events by category” to fine-tune event by event.
  6. Add the channels not to log to Ignored channels (IDs separated by commas).
  7. Click 1 “Save”, then Test a log to check that the message arrives in the channel.
  8. Use “Search & filters” to find an event (text, category, severity, member, author, channel) and export it as CSV, JSON or TXT.

Key settings

Save message content
Keeps the text of deleted or edited messages. Essential for moderation investigations.
Save attachment links
Keeps the links to files attached to deleted messages.
Ignore bots / Ignore bot messages
Avoids filling the logs with bot activity. Keep it on.
Show Discord IDs
Adds IDs to the logs, handy for searches and reports.
Pulse module logs
Turning this category off also turns off the dedicated log channels of other modules (Temp Channels, Tickets, Giveaways…).

Tips

  • Give the bot View Audit Log: that’s what lets it show who performed the action (kick, channel deletion, role change…).
  • Pair the logs with Pulse Restore (“Open Pulse Restore →” link) to undo admin changes spotted in the history.

Frequently asked questions

I don’t get anything in the logs channel.

Check that Enable Pulse Guild Logs and Also send to a Discord channel are on, that a channel is selected and that the bot can write in it. Then click Test a log.

The author of an action shows as “Unknown”.

The bot is missing the View Audit Log permission.

My old logs are gone.

Events older than the chosen Retention are deleted automatically. Increase it if you need to keep a longer history.

Pulse Restore Rolls back admin changes (channels, categories, roles, nicknames) by restoring the state before the change, and creates full server backups. Security Premium: higher limits /restore 8 steps

Analysis, dashboard backups and restoring (/restore, Pulse Restore section) require Premium. The /backup command creates a backup point without requiring Premium.

Permissions: Commands limited to members with Manage Server (or Administrator). To restore, the bot needs Manage Channels, Manage Roles, Manage Nicknames and View Audit Log (“Discord audit” source). Its role must be above the roles to restore.

Commands

  • /restoreOpens the Pulse Restore panel to back up, analyze and restore the server’s administrative changes. Premium.
  • /backup [label]Immediately creates a backup of the server’s configuration (channels and roles). label names the backup point.

Step-by-step setup

  1. Activate Premium on your server: without it, the Pulse Restore section only shows “Premium feature”.
  2. As soon as your server is properly set up, create a backup: /backup label:Avant refonte, or the Backups tab → Create a full backup.
  3. Click Lock on important backups to keep them forever. Only the 3 most recent backups are kept by default, and the oldest unlocked one is replaced.
  4. If something goes wrong, open the Configure analysis tab: pick the period (Start, End) and the sources (Bot logs, Discord audit).
  5. If needed, filter by Who made the change (author) or Who was changed (target), tick the categories to restore, then click Analyze.
  6. In the results, untick what you don’t want to put back, then click 🧪 Simulate to see how many actions will be complete, partial or skipped.
  7. Type RESTAURER in the confirmation field and start the restore. A safety backup is created automatically right before.
  8. Follow the result in the History tab, which keeps past analyses and restores.

Key settings

Bot logs / Discord audit
Analysis sources: the snapshots recorded by Promo Pulse, and the Discord server’s audit log. Tick both for a complete view.
Lock
Protects a backup from automatic replacement. If all backups are locked and the limit is reached, you need to unlock or delete one to create a new one.
✅ Complete / ⚠️ Partial / ❌ Impossible
Complete: names, permissions, roles, nicknames (IDs are kept). Partial: the item is recreated with a new ID, unban, bot limits. Impossible: deleted messages, tokens, global avatar.

Tips

  • Run a /backup before every major change (channel overhaul, new role system): it’s your guaranteed restore point.
  • Always use Simulate before restoring: the preview shows exactly what will be put back.

Frequently asked questions

Can deleted messages be restored?

No. Discord doesn’t allow recreating messages. Pulse Restore puts back the structure: channels, categories, roles, permissions and nicknames.

“Backup limit reached and all are locked”.

Go to the dashboard → Pulse Restore → Backups, then unlock or delete an old backup before creating a new one.

A deleted channel was recreated, but my links to it no longer work.

That’s a partial restore: a recreated channel gets a new Discord ID. The bot remaps its own settings, but links already posted still point to the old ID.

Clear (channel cleanup) Bulk-delete messages from a channel or a member, or recreate a channel identically, with live progress. Security Free /clear 6 steps

Permissions: Limited to the server’s Administrators and owner. The bot needs View Channel, Read Message History and Manage Messages in the target channel, and Manage Channels for the recree option.

Commands

  • /clearWith no option, opens an interactive panel (mode, channel, member, amount, “Start” button).
  • /clear nombre:50Deletes the 50 most recent messages in the current channel (1 to 1000).
  • /clear tout:TrueDeletes every accessible message in the channel.
  • /clear salon:#salonCleans a text channel or thread other than the one where you type the command.
  • /clear membre:@Utilisateur nombre:25Deletes only that member’s messages.
  • /clear recree:TrueDeletes the channel, then recreates it with the same name, position and permissions. Irreversible; a confirmation is requested.
  • Right-click a message → Apps → ClearStarts the cleanup from a message.

Step-by-step setup

  1. Go to the channel to clean (or prepare the salon option).
  2. Type /clear with no option to open the panel, or use a quick option directly.
  3. In the panel, pick the mode: recent amount, all messages, one member’s messages, or recreate the channel.
  4. Pick the amount (a preset value or “Custom amount” between 1 and 1000) and, if needed, the target member.
  5. Click Start: progress updates live, then the result shows the messages analyzed, targeted, deleted and the failures.
  6. For recree:True, confirm with Confirm recreation. The new channel is shown at the end.

Key settings

nombre
Number of messages to delete, from 1 to 1000. Can’t be combined with tout.
tout
Purges the whole channel. Pick either nombre or tout, not both.
membre
Limits the deletion to that member’s messages. Combine it with nombre or tout.
recree
Deletes and recreates the channel (text or announcement, not threads). Can’t be combined with the other options.

Tips

  • Messages older than 14 days can’t be bulk-deleted by Discord: the bot deletes them one by one, which takes longer on old channels.
  • To completely empty a very large channel, recree:True is almost instant. Careful: the channel gets a new ID, and links or settings that pointed to the old one must be redone.

Frequently asked questions

“A cleanup is already running in this channel”.

Only one cleanup at a time per channel: wait for the previous one to finish (progress shows in its reply).

“The bot doesn’t have the required permissions in this channel”.

Give the bot View Channel, Read Message History and Manage Messages in that channel, and Manage Channels for recree.

A moderator can’t see the /clear command.

It’s limited to Administrators and the owner. For your moderators, use Pulse Moderation’s Delete message Apps menu instead.

Troubleshooting

Common problems

Issues that affect every module: permissions, roles, Premium, saving.

PROMO PULSE commands don’t show up when I type /.

Check that the bot is online (see the Bot status page), then in Server Settings → Integrations → PROMO PULSE make sure the commands aren’t restricted for that channel or role. Members also need the Discord permission “Use Application Commands” in the channel.

My server doesn’t show up in the dashboard.

The dashboard only lists servers where you have the Manage Server permission and where the bot is present. Invite the bot if needed, then log out and log back in to refresh the list.

I can’t open a module’s settings on the dashboard.

A disabled module can’t be opened. In Manage modules, turn on the switch on its card: the page opens directly on its settings.

The bot can’t give or remove a role.

Discord enforces a hierarchy: the PROMO PULSE role must be above the role to assign in Server Settings → Roles, and the bot needs the Manage Roles permission. This is the #1 cause of problems with captcha, XP, the tag role, status roles and game roles.

The bot doesn’t post anything in the chosen channel.

Open the channel permissions and check that the bot can View Channel, Send Messages, Embed Links and Attach Files. A permission denied on the category also applies to the channel.

I bought Premium but nothing is unlocked.

Premium is tied to a server, not to your account. On the right server’s dashboard, Premium tab, click Sync from Discord to pick up the subscription immediately.

My changes aren’t applied.

On the dashboard, each section has its own save button (the last numbered marker on the screenshots): click it before changing page. In Discord panels, each valid choice is saved immediately.

Discord or dashboard: which one should I use?

Both change the same settings. /setup is ideal for checking module status and making quick changes; the dashboard shows every field, previews and history. Pulse Moderation and Server Logs can only be configured on the dashboard.

How do I change the bot’s language on my server?

Dashboard → Configuration → “Server language”, or the Language button in /setup. All the bot’s messages follow this choice.

I want to reset everything.

Dashboard → Configuration → “Start from scratch” → Reset configuration. Good to know: if you remove and then re-invite the bot, its configuration is kept for 7 days and comes back automatically.

Still stuck?

The team answers on the support server. Tell us the module name, what you expect and send a screenshot: we’ll help you finish the setup.